You have 0 items in your cart
The Only Homemade Pizza Dough Recipe You’ll Ever Need
This post may contain affiliate links. View my privacy policy and disclosure policy for more details.
Homemade Pizza Dough doesn’t get easier or more reliable than this. It’s soft, stretchy, and bakes up with that chewy center and golden edge everyone loves. The flavor is balanced, the texture is spot on, and it comes together with basic pantry staples. I tested it with different flours and rise times until it nailed that perfect consistency every single time. I even figured out the exact kneading sweet spot to get that soft, stretchy dough just right. You’ll love how simple it is to make, and how good it tastes. Don’t believe me? Just take a look at the 700+ 5-star reviews it’s received over the years.
If you’re looking for a whole wheat option try my Whole Wheat Pizza Dough Recipe. And if you don’t want to make 2 full pizzas, check out my Small Batch Pizza Dough Recipe that is perfect for one or two people!

Ingredient Notes + Variations
This homemade pizza dough uses pantry basics, but it’s the ratio and technique that makes the difference. Each ingredient plays a role in giving the dough that ideal chewy-crisp texture.
- Bread flour – Higher protein than all-purpose, so you’ll get that satisfying chew. If it’s humid where you are, you might not need all 3 cups.
- Warm water – Make sure it’s around 107–110° F. Too cold and the yeast won’t wake up, too hot and your yeast won’t activate.
- Yeast – fast acting or regular active dry yeast is fine.
- Honey – to help activate the yeast. You can use granulated sugar in a pinch.
- Olive Oil – Adds richness to the dough and keeps it tender. It also helps the crust crisp up just enough without drying out.
Pro Tip: I recommend using bread flour for pizza dough because the higher gluten content (12-14%) gives it that ideal chewy texture. If you only have all-purpose flour, it still works… just knead it a bit longer to develop more gluten and you’ll be good to go.
How to Make Homemade Pizza Dough
This pizza dough recipe is straightforward, and you don’t need any fancy equipment (though a stand mixer makes things easier). The key is watching your dough’s texture as you go. Don’t dump in all the flour at once. For full recipe details, including ingredients needed and measurements, see the printable recipe card down below.
Step 1: Proof the Yeast

Combine warm water, honey + yeast and let it sit until it starts to foam.
Step 2: Mix the Dough

Add salt, olive oil, and half the flour. Stir together + add the rest gradually.

Use a stand mixer or knead by hand until the dough is smooth and elastic.
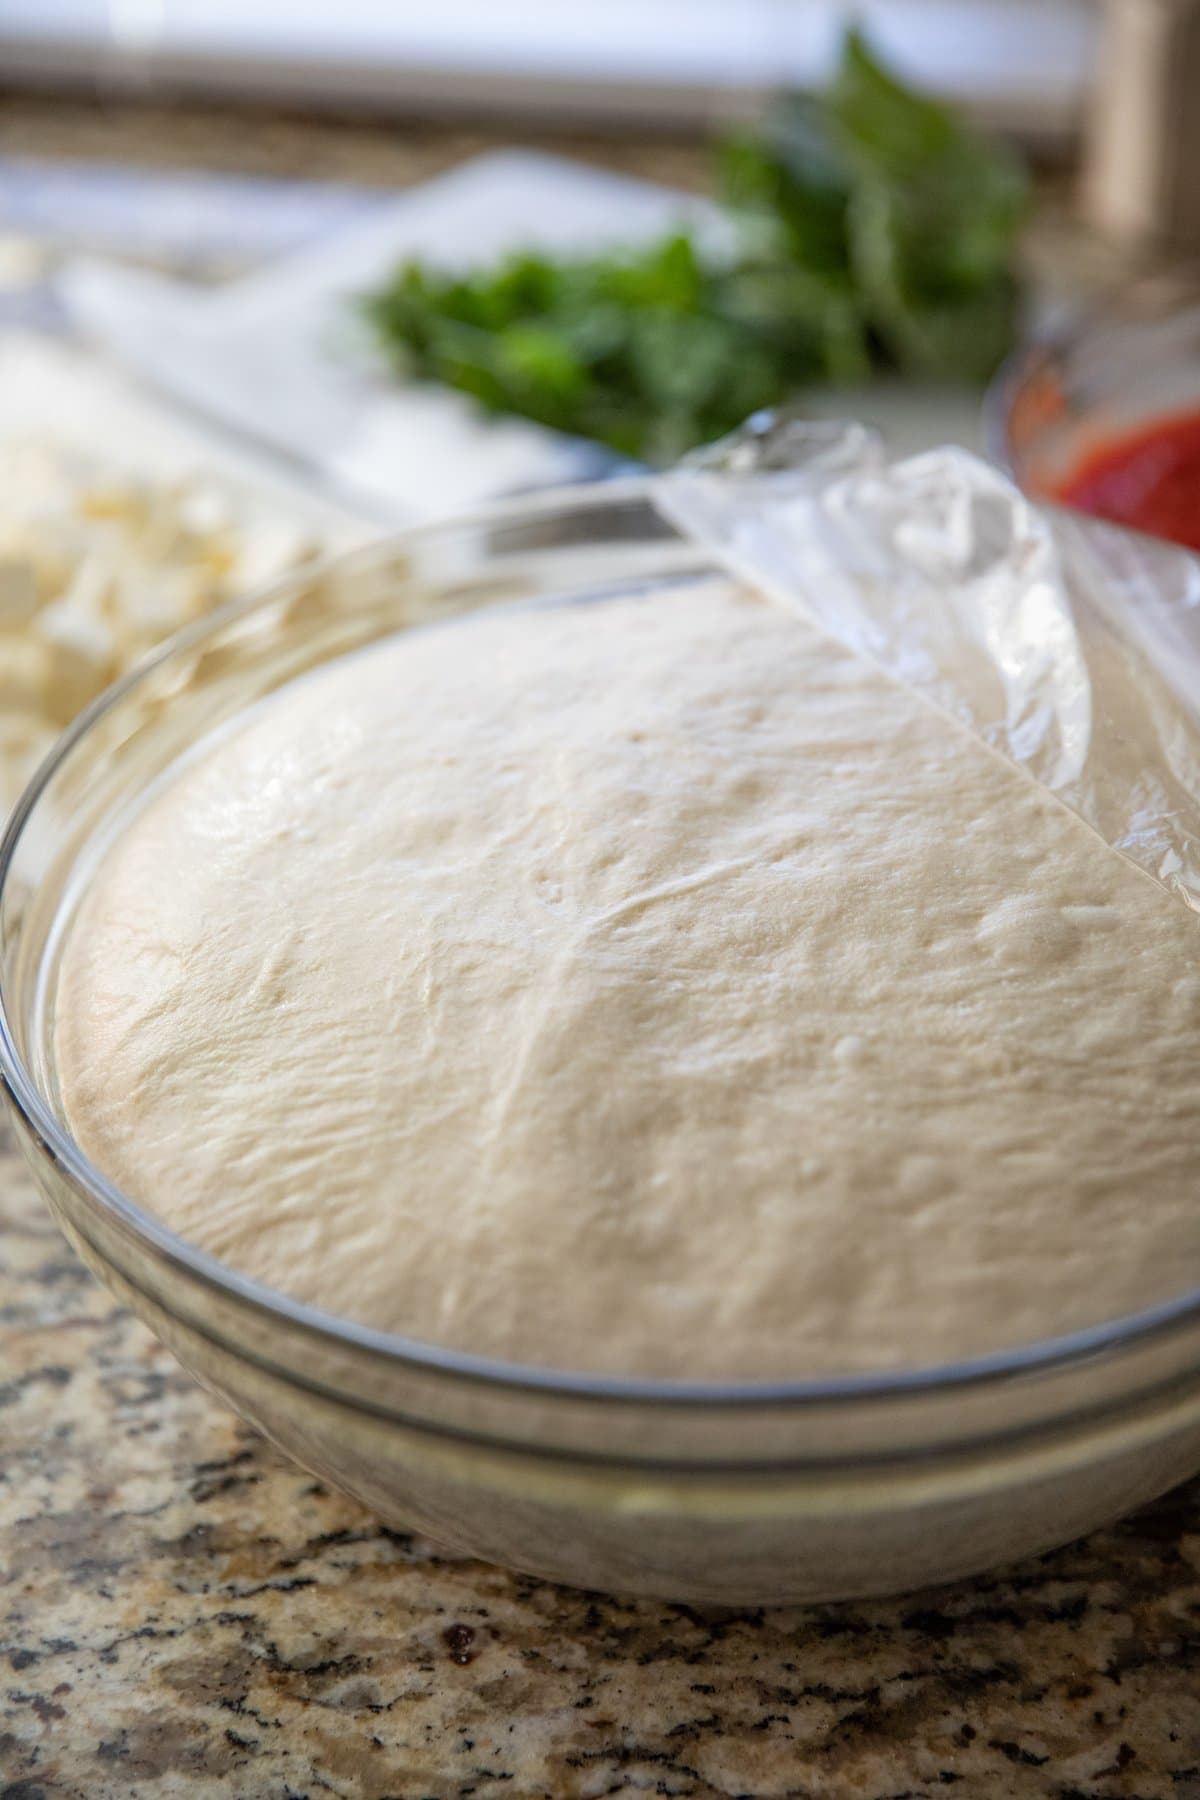
Step 3: Let it Rise

grease the dough + bowl lightly

cover with plastic wrap

let it rise until doubled (1-2 hours)
How To Use This Pizza Dough
Now you can turn this dough into anything your little heart desires (I highly suggest my super popular Homemade Stromboli). Divide into 2 separate dough balls if you want two 12″ pizzas, which is what this recipe makes. Feel free to divide them again for personal pan pizzas so everyone can choose their favorite toppings! If you only want to halve the recipe, I’ve made it really easy for you with this Small Batch Pizza Dough recipe. Or try my Whole Wheat Pizza Dough Recipe.
Your pizza dough should be easy to work with and be easily pressed out and formed into round pizzas. You can either use a rolling pin, use your fingers to stretch and press out the dough into a round shape or you can try tossing the pizza dough up in the air (like they do at those old school pizzerias) and use the back of your hands (think loose fists) to stretch the dough into shape. Boom. Hand tossed pizza!

Tips for Success
- Use a thermometer to check your water temp. Guessing can throw off the whole dough. Aim for 107-110° F.
- If your dough’s too sticky, add flour 1 tablespoon at a time.
- Let it rise somewhere warm (but not hot) like inside your oven with the light on.
- Don’t rush the kneading. It builds the gluten that makes pizza dough stretchy.
- If using later, refrigerate after the first rise to make it easier to handle.
- Use a Pizza Stone – This is a great pizza stone. Put it in your cold oven, and then crank that baby up to the hottest temperature it will go to. For me, it was 500° F. Let the stone preheat in that extremely hot oven for at least 30 minutes before using. That will really give you a crispy crust like you get at the restaurants. If you don’t have a pizza stone use an upside-down baking sheet.
How to Use This Pizza Dough
- Pizza Bubble Bread – Soft, pull-apart pieces loaded with cheese and pepperoni.
- Cheesy Bread Recipe with Pizza Dough – Buttery, cheesy, and the ultimate pizza night side.
- Bruschetta Pizza – Fresh tomatoes, basil, and balsamic for a lighter pizza option.
- Pepperoni Knots – Twisted, baked, and brushed with garlic butter.
- Cinnamon Twists – Sweet, buttery, and finished with a drizzle of icing.

This pizza dough is the kind of recipe you’ll memorize after making it twice. It’s that easy, and it delivers every single time. The printable recipe is below. Have a great day, friends!

Homemade Pizza Dough
Homemade pizza has never been easier with this simple Pizza Dough Recipe! Easy to follow, minimal ingredients required and always delicious.
Ingredients
- 1 cup warm water aim for 107-110° F
- 2 1/4 teaspoons active dry yeast
- 1 tablespoon honey or sugar
- 1 teaspoons salt
- 2 tablespoons olive oil
- 3 cups bread flour give or take 1/2 cup, depending on the heat & humidity
Instructions
- In a large mixing bowl, preferably the bowl of a stand mixer, stir yeast and honey into warm water. Let yeast mixture sit for 5-10 minutes or until bubbles form and mixture starts to foam. This tells you that the yeast is alive and kicking.
- With the mixer on low, add in salt, oil and half the flour. Once that flour is incorporated, start adding flour in bit by bit until you get the pizza dough to the consistency you want: slightly tacky, but when you touch it, it doesn't stick to your hands. The dough should also be cleaning the sides of the bowl but still sticking to the bottom. This is normal!
- Once you reach this stage, turn the mixer on a low to medium speed to knead for 6 minutes. Turn a timer on and walk away! Resist the temptation to stop earlier than 6 minutes! That seems to be the magical number. The dough should be smooth and easy to work with. And the bowl should be clean!*
- Lightly grease the bowl & the ball of dough with olive oil so it doesn't dry out, cover with plastic wrap and let it rise at room temperature 1-2 hours or until it's doubled in size. If your house is on the cooler side, place it in your oven with the light on.
- Once pizza dough has risen, you can use as desired.
Video
Notes
*This is the point when you could freeze your dough. Divide into portions, place into freezer bags, seal, removing all air, and freeze for up to three months.
Nutrition
Calories: 844kcalCarbohydrates: 146gProtein: 24gFat: 17gSaturated Fat: 2gPolyunsaturated Fat: 3gMonounsaturated Fat: 11gSodium: 1175mgPotassium: 227mgFiber: 5gSugar: 9gVitamin A: 4IUVitamin C: 0.1mgCalcium: 34mgIron: 2mg
Rate This RecipePlease consider Leaving a 5-Star Review!
Make Ahead + Freezing Instructions
To prepare your dough ahead of time, follow the directions all the way through. Cover and refrigerate for up to three days. Letting your pizza dough sit in the refrigerator in an airtight container for 18-24 hours really develops that delicious yeasty flavor. Not a necessary step but a delicious one. Next time you make pizza dough, give this a try! It’s tasty.
To Freeze: Simply follow the directions all the way stopping after you knead the dough for 6 minutes. This is the point when you could freeze your dough. Divide into portions, place into freezer bags, seal, removing all air, and freeze for up to three months.
To Use: Remove from the freezer and place the frozen dough in a greased bowl. Cover with plastic wrap and let it defrost, then rise until it has doubled in size; 6 hours or so, depending how warm or cold your kitchen is. Then use it as you’d like.
FAQ for Homemade Pizza Dough
How long should pizza dough rest before using?
30 minutes is the bare minimum you’ll want your dough to rest. Letting your pizza dough sit in the refrigerator in an airtight container for 18-24 hours really develops that delicious yeasty flavor.
How do I make homemade pizza dough more flavorful?
For a more yeasty dough, cold fermentation works wonders. Add olive oil to the crust. Mix in dried herbs like rosemary or oregano into the raw dough. Add honey or sugar to the raw dough. Brush cooked dough with garlic butter. If you have sourdough starter, consider adding it to your pizza dough.
My Pizza Dough Won’t Stretch. What Do I Do?
Forming, rolling and stretching your pizza dough into round pizzas shouldn’t be hard! I have found two main reasons why it can sometimes be difficult:
– You’ve kneaded too much flour into the dough, thus creating a dry dough making it difficult to rise and form into pizza crusts.
– If you haven’t let your pizza dough rest long enough after kneading, the gluten won’t have relaxed, thus making it hard to roll out or stretch into a thin pizza crust.
Solutions? There isn’t much you can do about dry dough. It’s so difficult to knead liquid into already dry dough, so be sure to be careful when kneading flour into it initially. Better to err on the side of sticky dough than too dry if you’re worried. You can always knead more flour into your pizza dough. If it keeps shrinking as you’re trying to roll it out, try letting your dough sit and rest a little longer to let that gluten relax.
Need More Pizza Recipe Ideas?
I’ve got you covered, check out all of my pizza recipes here!
- Margherita Pizza – Simple, fresh, and classic. Made with mozzarella, tomatoes, and fresh basil on a thin, chewy crust.
- Chicken Alfredo Pizza – Creamy brown butter Alfredo sauce, tender chicken, and melty cheese. Rich and totally satisfying.
- Country BBQ Chicken Pizza – Sweet and smoky BBQ sauce with chicken, red onion, and cheddar. Bold flavors that always win.
- Pesto Pizza – A veggie-packed pizza with herby pesto, melty cheese, and crisp edges. Flavorful and loaded with texture.
- Mediterranean Pizza – Topped with feta, olives, red onion, and sun-dried tomatoes. Savory, salty, and totally addictive.
If you make this recipe, I would really appreciate it if you would give it a star rating and leave your review in the comments! If you have a picture of your finished dish, post it on Instagram using the hashtag #laurenslatest and tagging me @laurens_latest.


THIS IS THE BEST PIZZA DOUGH that I have ever made. I’ve been on a quest to learn to make good pizza dough. Some were good, others were total failures. But this recipe is hands down the best one! I think for me, using my stand mixer instead of kneading by hand was the key to getting the perfect dough consistency. Thank you so much!
Thanks for this recipe! My fav pizzaria
(Barro’s) a great chewy crust… I’ve needed one to make at home. Your pics are great!
I would LOVE to make this gluten free! Any tips? Any suggestions for GF bread flour? THANK YOU.
Absolutely delicious
Hello, I have used your pizza dough recipe many times and my family loves it! I am going to make it again today and will refrigerate it for tomorrow. My question is how long do I let it sit at room temperature prior to rolling it out? Thank you for the amazing recipe!
This recipe is excellent! I had one I used for years but wanted to try a new one. I will be using this one now. I followed instructions exactly and used it for calzones. Turned out great! I used honey, nice touch and definitely not too sweet. Thank you!
Excellent pizza dough! Thank you for sharing this recipe – I will use this recipe from now on!
What attachment do you use to mix? Is it the dough hook the entire time?
I am an experienced home baker and this is the best dough I have ever worked with. I used it to make Stromboli and it handled perfectly. I’ll be making this again and again! Thanks!
Ok so I have definitely monkeyed with the recipe. I have Gestational Diabetes so I have been trying to make a good pizza dough with higher fiber and protein count. So at first I tried 1 1/2 cups of whole wheat flour and 1 1/2 cup of almond flour and 2 tablespoons of psyllium husk powder. This one turned out okay, but little to no rise when cooking. So I tried 2 cups of whole wheat flour and 1 cup of almond flour plus the Husk and increased the water amount. This one turned out much better flavor was pretty good, but was still hoping for little better. So I tried 1 cup almond flour, 1 cup whole wheat flour, and 1 cup of white flour, plus the husk and little more water. This one was great, flavor was fantastic. My real question now is any recommendations on adjustments to the ingredient amounts for a little bigger/thicker pizzas. Cutting the dough in half leaves me with pretty thin pizzas, bit using all the dough leaves me with a little 2 thick on my biggest cookie sheet. Should I double the recipe and cut it into 3 pieces ?? Or do you have any other suggestions
If I want to refrigerate my dough, should I let it raise first?
How far in advance of using the dough do I remove it from the fridge? Di I let it raise again?
Fabulous crust and pizza. I have not had good luck making bread but your instructions seemed so clear i gathered up my courage. Having detail and clear instructions along with the photos was so helpful.
The pizzas were just perfect – much better than bought. They really delicious too. Everyone loved them.
Thanks so much.
Glad your pizzas turned out perfect Kathleen, thanks for your comment! 🙂
Hi,
I didn’t read through the 1,000+ comments, yet. Are there any recipe modifications that you recommend for high altitude?
Thanks,
Beth
I like dough with a little flavor. could I add some garlic?
This is the best pizza dough I’ve ever tried. I also read quite a few of the many helpful tips and learned some things that helped out – for example, after 2 hours rising, I was struggling to roll and stretch the dough out and I knew I did not put too much flour in it. So, as suggested, I returned it to let it rest more – for a total time of about 3.5 hours – and it was a dream. Thank you!
I only have one small critique… I’ve worked in a number of commercial kitchens specifically making pizza. Something I discovered was that using oil or grease on the dough as it rests or rises actually hampers it. I was told that it neutralizes the chemical reaction it needs to have in order to rise correctly. Splashing the dough with a tiny bit of water will have the best effect and won’t dry out.
Your recipe says 2 1/4 tps of yeast, instead of 2 1/4 oz packets..plz fix
Jeremy, the recipe is correct as written. Use 2 1/4 teaspoons of yeast.
I buy yeast by the jar so 2 1/4 tsp. works for me glad it was was written that way
2 1/4 tsps of yeast = one packet of dry yeast. Every recipe I’ve tried calls for 2 1/4 tsps.
This is a no fail recipe! It’s amazing! I would suggest the honey over sugar, it’s list either/or. So much cheaper and healthier! Love love love!
This recipe has saved me hundreds of dollars in takeout . It’s incredibly easy to put together, very easy to stretch and make into either one big sheet or several individual pizzas. Best thing, though, is that every. freaking. picky-a-d person in my house will eat it.
Thank you so much for sharing it!
This is my go to pizza dough recipe!!!! Always comes out great.
I’m getting ready to make the butter garlic bread sticks. it would be helpful if you told us how much butter and garlic to use.
Yum. Great dough.
Pizza dough was more like a bread dough. Good, but not really a pizza dough.
Seems like a great recipe, terribly intrusive ads render your mobile page nearly unusable.
I get that you need to make money for sharing recipes, but the ads and pictures used in this recipe are the most atrocious I have ever come across. You have the best ratings and reviews, but I can’t even follow the instructions because my web pages won’t load with how many images and ads you have IN THE RECIPE CARD ITSELF. Please try to be considerate of people with worse internet or technology, have your pictures in your blog portion, but PLEASE make the recipe and instructions TEXT ONLY. Please.
Try Ublock Origin, I don’t see any ads .
Hi! How would you adjust for high altitude?
Hi. Could I make pepperoni rolls using your pizza dough recipe? No cheese, just pepperoni? If so, how many grams of dough per roll would you suggest? Thanks in advance.
Just found this recipe. I like the idea of making the dough and letting it rise overnight in the refrigerator. How long should the dough sit outside the fridge prior to using or can you role out the dough straight from the fridge? Thanks.
What temp should you cook this at for pizza?
Question; I made my crust yesterday and have it in the fridge, do I need to let it come up to room temp before rolling it out?
I’ve made this before (and it’s amazing!!) just never have put in the fridge the day before so Im excited to try it this way! Thank you!!
Great dough, easy to work with and it baked up so nice. Thank you for sharing.
You obviuosly dont know pizza. Best pizza doughs are made with “00” flour. Sure bread flour is better than all purpose. But a true pizza made with “00” flour and yeah flieshmans yeast readily on shelves. Do your self a favor and order caputo levita yeast
I have tried many recipes for pizza crust and purchased dough from local pizza places. I usually use NY times recipe for Roberta’s pizzerias crust. This is is hands down the best I’ve made. Can be thick and chewy or thin and crispy. I was able to get three 10” crusts, they were slightly thicker, but they were sturdy enough to hold a substantial load of veggie toppings and was perfect with a thin load with curl and char pepperoni. Won’t try finding another recipe. This is it
Can I use this recipe for bread?
I’ve never made fresh dough…
What does it mean when I don’t get the ubbles in the first step?
Doubled the recipe, added a little bit more honey than what’s called for and used a good amount of EVO oil on my pizza pan. The flavor was amazing. If you leave the crust thick, it almost tastes like a pizza hut crust.
forgot to add.. I used 00 flour instead.
Add half cup of semolina with the flour for crispness
Found the recipe confusing and hard to navigate and though I tried to follow the recipe perfectly our dough turned out totally flavorless and made a bad pizza. Worst pizza we’ve ever made.
My mom-in-law shared this recipe with me a few years ago. I’ve been using it more and more. My husband has been skeptical of my homemade pizza in the past but declared this one to be good. He gets excited when I tell him I’m making pizza these days! I like this so much better than any of the local pizza places.
What’s your experience to make ahead and just refrigerate like 24-36 hrs before use?
can I use a bread machine to knead and let rise??
How do you do this in a bread machine?
tried it today 6/26/22. great recipe. only alteration … i sprayed the parchment paper with some vegetable spray because my dough was sticky.
Made this tonight. Didn’t have bread flour so used 50/50 all purpose and 00 Flour. Used full 3 cups – might try a little less next time. Made prosciutto and pineapple, with homemade sauce and mozzarella. As mentioned on another recipe, I baked at 425 on the bottom rack about 18 minutes , which left the bottom crust to well done, I love my pizza pan, but think the bottom rack was a mistake because it is a dark pan. My husband likes cheesy bread, so will experiment further with that next pan,
Made this for the first time yesterday, so easy and everyone loved the pizza crust, this is my new go-to pizza crust recipe!
Can I use less honey and salt? How much less?
I wouldn’t recommend less salt or honey. The salt gives flavor and the honey gives the yeast something to eat (which helps it rise).
I doubled the recipe but only needed 4.5 cups of flour. Not the 6-8 I would’ve assumed it needed. I live in a humid climate on the west coast of Canada. But I make sure my humidity in my house isn’t more then 40%. Not sure if that will help anyone. But thought it was worth noting.
Hi there, I like this recipe and want to use it to make sausage breads (filled and rolled) for Xmas day. Can you tell me the finished weight this recipe produces as written. I need to make 1 to 1 1/2 lb dough balls (total around 3 ish lbs of dough) plus or minus a little of course. Thanks.
Holy sheep shit, Batgirl! That’s the best pizza crust I’ve ever had!!! I made just regular cheese pizza and used the garlic butter under the sauce and cheese and damn, girl! You have a winner here!! Thank you so much!!!’
Awesome dough. Love, love, love it and I’ve tried a number of different recipes. This is the best! Thank you for sharing it.
How do you get this from not bubbling while in the oven?
Thank you for the recipe, it is absolutely delicious! Can the recipe be doubled so that extra portions can be frozen down?
would this work if i made the pizza dough in the bread maker ??
I was wondering about leaving the dough in the refer for a day or two. Do I let it rise the second time for 1- 2 hrs before putting into the refer ? Thanks, Jim
If you’re leaving the dough in the fridge for several days, it will rise on its own. The only reason to leave it on the counter for maybe an hour would be to have it come to room temperature so its easier to work with. Leaving the dough in the fridge will also develop that yeasty flavor which is so delicious! I hope you love it!
Can you make this pizza dough with whole wheat flour?
Here’s the recipe for whole wheat pizza dough: https://laurenslatest.com/whole-wheat-pizza-dough/
It is definitely the best I’ve tried. I rolled it in semolina just before I made the pizzas… perfect 🙂
Made this recipe for the first time and it turned out fantastic. I used a Pizza Pan as I don’t have a stone and Pizza took about 25 minutes to cook properly. I oiled pan and added some cornmeal for a fantastic bottom crust. Next time will turn temp up to 450° to get a crispier texture.
Thank you for allowing me to make my hubby very happy with a go to Friday pizza night recipe 🙂 we love this recipe!
If you refrigerate the dough do you punch it down first and form a ball or keep it in the bowl all double rised? Does it have to warm to room temp in order to use the dough? Thanks
If you’re storing it in the fridge, you can just leave it be until you’re ready to use. It will be easier to work with once you bring it to room temperature. Once its at room temperature, punch it down and use as you’d like.
First time I ever attempted making pizza dough and it came out fantastic! Family absolutely loved and I was pretty proud! Thanks Lauren.
I love this recipe! Its easy to make and so gratifying when it turned out beautifully. My toppings included garlic oil base with mushroom caramelized onion with goat cheese and moz. I’m going to make i Ina Garten’s brussels sprout carbonara pizza this weekend, but this will be my dough recipe!
ooh that sounds fabulous!
YAHOO is the worst. I had to post a comment, which I now regret, before I could see your recipe. I love the recipe and I’m eternally sorry for my previous comment.
I cameback to this recipe because i pinned it and like it. But the adds are soooooo many i cant even seecmy screen to read the recipe..
This is my go-to crust recipe. Thanks for sharing.
Can’t wait to try this, I have tried sooooo many pizza dough recipes and not happy with any so far..Thanks, I’ll let ya know how it goes.
Best recipe I’ve found for pizza, so perfect! I did use half pizza flour and half all purpose. Question, for nutrition, how many servings did you base that on? For one whole pizza or two?
Thank you for the insanely quick reply, considering this post is 10 years old! It’s a good thing this blog is still up and running because of all of us trying to become chefs in this quarantine, hah!
This is great to know…I looked it up and a hand tossed medium Domino’s pizza, crust only, is 1050 calories…this is so much better!
This crust is amazing, thank you so much, now I can make my house smell like Dominos anytime, lol! I am curious though at the calorie count. It says 876 calories, is that 876 calories per pizza or for both pizzas? How are these numbers calculated anyways? I think overall it is healthier than Dominos?
Its a total number of calories for the entire recipe of dough. So if you made two pizzas, that would be the nutrition for both crusts. And yes, odds are anything homemade is better than Dominos!
Do you have this for sourdough?
Do you have measurements for making this with sourdough starter and not yeast?
This is like the fifth time I’m making this pizza and it’s really great!
Now, after four successful pizza weekends, today I had my first problem. Mixer couldn’t deal with the dough anymore (after only 1min of kneading) and I had to finish kneading it manually. This might be from the mixer itself though because the structure is looking great. Also rising time would be about 5h since I’ve started too early so I’m hoping not to overrise it.. Fingers crossed!
I am making it as we speak!! Will post pics when done!!! Yummy!!!!!
I’ve been making this recipe for 7+ years and won’t use any other. I prefer it to any restaurant pizza dough I’ve ever had. If you don’t have “bread flour”, you can put a tablespoon of wheat gluten in a measuring cup, then top off with all purpose or whole wheat. I’ve never used store bought bread flour because I like using whole wheat flour.
Ok now I’m going to grumble. ? I’ve had this recipe saved for years, but admittedly don’t make pizza regularly, and I went to use it tonight and it wasn’t saved in my Pinterest any longer. It had disappeared. So I went hunting and thought you were hijacking it from the original person because the name of the page changed. After researching, nope. You’re one and the same and I felt so much better. However, I’m thinking that maybe when you changed that, I lost it from my saved files. I could be wrong and it’s just coincidence. But I thought I’d mention it. It drove me nuts for a bit. ?
In a pinch (such as our state is locked down), can I use bleached All Purpose flour? I have used this recipe a million times but always had bread flour and it was awesome! I just don’t want to make something that is inedible. Thanks!
absolutely!
Thank you for replying so quickly! Dinner tonight!
Chicago girl here…this recipe ROCKS. THANK YOU SO MUCH FOR SHARING. ONE question do I need to alter it in any way in order to make a Chicago style stuffed pizza…crust on top and on the bottom. Thank you
[…] Recipe adapted from Lauren’s Latest […]
[…] Pizza Dough (we make this one all the time – no tomato sauce – just brush dough with melted butter & garlic and top with cheese – so good!) […]
Ok so funny story I pinned this on Pinterest along time ago. Loved it and it became. A favorite. Today I went to Pinterest to grab it because I couldn’t find it printed out and I almost died when I saw this was yours i’ve been flowing you in insta for a few years and didn’t even put together you were the famous pizza dough recipe maker ?
Made this and it turned out perfect for Stromboli’s. I want to make pizza on a week night. I’m thinking of using instant yeast for the sake of time. Would it come out just the same if I used instant yeast?
[…] 1/2 lb pizza dough (I used Lauren’s recipe) […]
[…] cheated and used a pizza and scone dough made daily by my local grocery store, but you could give THIS no-fail pizza dough recipe from Lauren’s Latest a […]
This has been my “go to” pizza dough recipe since I found it. I’ve made it countless times and it truly is fail proof!
Yum! I made the pizza dough, and the cheesy garlic breadsticks. The house smelled amazing, and the finished product was delicious. I may have hot-cheese-burned the roof of my mouth, a bit impatient for the cooling process :). Thank you!
My go to recipe for bread sticks and pizza! I have used it to a few years now and served to friends n family
This is the first recipe of yours that i tried, many years ago. It is still my go to, always comes out perfectly. The Cheesy breadsticks are amazing!
I love this recipe – works every time and it’s delicious!
Any recipe using yeast is very intimidating. Plus I’m not so great at being patient. I’d definitely try this recipe – cheesy breadsticks look SO good!
This looks so yummy! I can’t wait to try it and my toddler will love it! 🙂
My favorite pizza dough recipe and method of cooking (the tip with the sheet pan)!
This is the first recipe of yours that I made. It is still a winner in our house years later and how I found your blog in the first place.
I will be trying this! Pizza/ breadsticks are always a hit here. And I have been looking for a good dough recipe
This was my very first recipe I made of yours years ago! I remember being so afraid to let my kitchenaid mixer run for that long! ??. It turned out absolutely perfect. In fact, I think cheesy garlic breadsticks are going to be on the menu this weekend!
These cheesy garlic bread sticks look so good. I can’t wait to try them. Plus, I love how you used parm in addition to the mozz for more flavor and texture. Yum. PInning now to try soon!
[…] Fail-Proof Pizza Dough and Cheesy Garlic Bread Sticks […]
We have made this dough many times. It has become our favourite. Thank you!!!
The best pizza!!Thank you for sharing
Wow! Awesome! This pizza dough looks amazing. I would try making it for sure! Can I post it on my blog, Lauren?
[…] make some pizza dough, pick up some olives and get […]
[…] Fail-Proof Pizza Dough and Cheesy Garlic Bread Sticks […]
[…] Recipe source: Lauren’s Latest […]
I followed the directions and it came out perfect. Thank you very much. Best pizza recipe… Love it
I dont see the cheese garlic bread recipe just the dough.
The link isn’t working. Instead of the Cheesy Garlic Bread Stick recipe, the dough recipe just repeats. Help! I need the recipe for a party!
After many failed attempts with pizza dough…… This recipe was perfect!!!! I’m very picky when it comes to pizza, and this is now my go to recipe! Thank you so much!!!
[…] Fail-Proof Pizza Dough and Cheesy Garlic Bread Sticks […]
I dont have a standing mixer, can I use my regular mixer with no attachments. I do have a food processor!!HELP!!
Just knead by hand! No big deal 🙂
WHERE did the recipe for the cheese sticks go?
They were here because I made them (spectacular by the way) before.
[…] * From Laurens Latest […]
I use this recipe every time I want to use pizza dough (pizza, stromboli, garlic knots, etc). I can always rely on this recipe to produce a beautiful dough that will make great pizza. I have experimented with the dough a little and it turns out great even if I use all-purpose flour, spelt flour, or a different kind of yeast. I have also made this dough by hand, I just add couple minutes to the kneading step to make up for the fact that I’m not using a stand mixer.
Absolutely love this bread recipe. It’s the only one I use. I make it every Friday night, my husband and kids love it. ???? I’ve also done it for other members of the family and they can’t believe how amazing and authentic the bread turn out ?
Really superb. ?
[…] out by spreading your pizza dough out into a rectangle on a baking sheet. I used my Fail-Proof Pizza Dough Recipe because it is in fact fail proof. And I also used parchment paper because I didn’t want to […]
One of my favorite go-to recipes!
Yum. Can’t wait to make pizza dough.
This is my ALL-TIME favorite pizza dough recipe! I make it several times a month. Even better than Bobby Flay’s, real talk. Thank you so much!
Mmmmmmm, cheesy bread. Drooling now!
Can this be doubled for two shells?
Nevermind just read s comment above that it makes two. Thank you.
It’s so good I think, want to make it
Like , before the 6 minute kneading process.
Is the mixer on while you are achieving the desired dough consisitnecy?
Thank u for sharing an amazing recipe! My boys absolutely love pizza night now! God bless you. ?
How big of a pizza will this one recipe make? Is this for one 12″?
One recipe will make one 18 inch pizza or two 10-12 inch pizzas.
Has anyone made this dough a couple years f days ahead and just refrigerated it instead of freezing? What was the process? Thanks.
I love this recipe! It never disappoints! I love making 5-10 batches at a time and freezing it! 🙂
Stumbled across this while searching for a new pizza crust recipe for tonight. The addition of a bit of honey intrigues me…looking forward to testing it out later today!
Love your pizza dough!!
This recipe sounds wonderful!
Can you make it and freeze it? Would you freeze it after the first rise?
Thanks!
I would freeze it before rising and then defrost in an oiled bowl and rise.
Thanks so much!
[…] * From Laurens Latest […]
This looks great.! I want to make the cheesy garlic bread sticks and the pizza but all I see is just the recipe for the pizza crust. Where is the recipe for the cheesy garlic bread sticks and the recipe for pizza please? Thank you for your help! ?
I have a question,
Would all purpose flour work as well or does it have to be bread flour for the dough?
You can use all purpose no problem!
[…] 1. Fail proof pizza […]
Where are the measurements for the garlic butter and cheeses??
Where is the ingredient list for the dough?!?
Where’s the actual recipe?!?
Reading the reviews for this recipe was crazy. Thoughts and ideas bouncing every-where! Lets back up. Another reader asked you this also. What to do with extra dough? Freeze in a ball or roll out pizza style? How long to unthaw? Has anyone prepared this right to the baking step and then froze it. Let’s take Fail-Proof Pizza all the way to the last stage.People who have frozen, speak up! Thank you for the recipe Lauren! Barb
I freeze my dough in a large ziploc freezer bag right after it has been kneaded, before it has risen. To defrost, place frozen dough ball into a greased bowl and cover gently with a clean kitchen towel. Dough is ready to use after it has defrosted and risen to double the size.
The amount the salt must be wrong. 2 tsp? Way too much. 1/2 is close. My bread stick came out just so so.
You are right! It’s a typo! It’s supposed to be 1 teaspoon.
I have amino caputo pizza flour. Can I use this in place of bread flour?
[…] 1. Fail Proof Pizza Dough and Cheesy Garlic Bread Sticks {just like in restaurants!}–this little recipe of mine has made it to Timbuktu and back. You guys can’t get enough carbs! […]
HI Lauren! My name is shavanna, I am new to the blogging world and wanted to say that I have been using your pizza dough recipe for a couple years now and it is my go to! One of my featured recipes I use this dough! http://makingherstory.online/kentucky-hot-brown-pizza/
Thanks for the wonderful recipe! I would love to put a link to your recipe!
I have been making this dough for years. It’s amazing and never lets me down. One of the first recipes I ever made from your site. 🙂
Every we make homemade pizza we make this garlic cheesy bread!! Sooooo goooood!!!!
I’m planning on making this for our Valentine’s Day dinner!
[…] out with some pizza dough. I used my Fail Proof recipe and mixed it with half bread flour, half white whole […]
Hi I’ve made this recipe before and love it but now for some reason I can’t see a list of ingredients for the dough? So I have no idea how much yeast honey flour etc to put in! Could you help me out?
Sorry, got it back up!!
I pinned and have been using It for years! Wtheck did pizza dough recipe go!
[…] this portobello pizza is pretty amazing, considering there is no real crust. {I know. I’m posting meals with no carbs in them. What has become of me?!} It tasted *just* […]
[…] do this:Start out by rolling some pizza dough into a large rectangle. I would highly recommend my fail-proof pizza dough recipe but fresh dough sold at grocery stores these days will do! Spread a thin layer of pizza sauce on […]
How long do you out cook the breadsticks for?
[…] garlic cheese bread INGREDIENTS: […]
I enjoyed reading your post. My problem is that no where did I find exact measurements for any of the ingredients for the dough listed. Are the somewhere that I didn’t see?
Please advise.
Thanks
It was set as “private” when I switched over to this new layout for my blog. It’s “public” now!! Sorry about that!
Thanks!
What happened to the ingredients list for the dough and the mesaurements? This is my favorite crust recipe, I’ve made it at least half a dozen times and I don’t see the measurements for the dough ingredients anywhere on the page
The recipe was set to “private” when I switched over to this new layout for my blog. It’s “public” now!! Sorry about that!
[…] Pizza dough, bread, cookies and cinnamon rolls all happen in my mixer. Why? Because it’s faster and easier than doing it by hand. And because my husband washes all the dishes I dirty…most of the time. {How did I become so lucky?} […]
[…] grab some fail proof pizza dough {I had some left over from a few nights back that I pulled out of my fridge} and bring it to room […]
[…] about 1 lb. of pizza dough and spread it onto a baking sheet sprinkled with cornmeal. {Or just use parchment paper.} Spread […]
[…] used my Fail-Proof Pizza Dough, threw on some taco toppings {basically, everything mexican-ish taken from my fridge} and baked it […]
[…] get some fresh rosemary. Or dried, I guess. They’re both rosemary. Chop that up.Now grab some pizza dough, spread it out, drizzle on some olive oil and garlic powder, then top with some cheese, the […]
Making these tonight to go with our spaghetti! 🙂
This is the recipe that turned me on to your blog! I love it and your blog, thanks for all the recipes and updates ❤️❤️❤️
My kiddos love making these breadsticks. Thanks for the recipe!
Love this dough and cheese bread. My go to when I plan ahead for pizza nights! SO good!
Love this recipe! My absolute favorite go-to when it comes to making pizza. Now that I have found this I rarely ever resort to frozen anymore 🙂
Best pizza bread dough ever!!! Thank you so much for sharing your recipe. My kids love it!!!! Never buying pizza again out of my pocket money ????????????????????????
I try best made for this recipe…..
I really am useless around the kitchen but am sick of purchasing pizzas off the shelf so I thought of giving this a try but I have one major hurdle to overcome… A cup? I drink coffee out of one but know nothing of using a cup for measuring ingredients. What actual weight is the ingredients in the cup your using? Im confused, Please help
My daughter made this for her science extra credit, needed to bake something using yeast. This was a huge hit with the Fam & the classroom. AND, super easy to make. We are definitely making this again for pizzas & these yummy garlic sticks! Kneading in the mixer was a breeze, did have to put a hand on it so it didn’t walk off the counter. : )
My son built us a pizza oven and I was planning on experimenting on different dough until we found one that worked well- no need for the experimenting as this worked beautifully! It is the perfect texture for use in the oven (not sticking to the paddle) and think this is going to be the one we stick with- thanks so much 🙂
Look good enough to try.
Thank you.
I don’t have a stand mixer, just a hand mixer. Will mixing dough in by hand work once you have beat first half of dough and then knead by hand?
yes! kneading by hand will work just as well!
Can this be made ahead of time or in batches for later use?
Hi,
i am unable to find cake flour. Found this recipe online to convert all purpose flour to bread flour. Please let me know if this is ok or would i rather use all purpose flour.
Would this result in a recipe with too much salt?
Add 1 1/2 teaspoons baking powder and 1/4 teaspoon salt per cup (130 grams) of all-purpose flour.
Please reply urgently as i need to prepare this tomorrow. Thanks
Has anyone tried making the dough in a bread machine???
In your printable version of the recipe it doesn’t list how long to bake in oven.
Yes, it says 9-10 minutes just above the recipe but not in the printable version
[…] better than any restaurant puts out. And it is quite easy to make. Keep reading the full recipe at Lauren’s latest here. You gonna try it […]
I keep running into an issue with my stand mixer-whenever I try to use it to knead my dough even at the lowest setting it pulls my bowl out of the holder and detaches. Any suggestions?
Yes, what temp for the pizza and how long in the oven?
[…] FAIL-PROOF PIZZA DOUGH AND CHEESY GARLIC BREAD STICKS […]
How long do I bake the cheesy bread for..tia
Your cheesy garlic breadsticks are the best! So yummy!!! My entire family loves them! 🙂
This is is by far the best homemade pizza dough!!! My family loves it! There isn’t a recipe of yours that I haven’t loved yet!!! Thank you!!
My family loves this recipe to make the cheese bread & pizza. It is so good!
I love this recipe. I make it all the time! It’s so easy. ????
Love love love this dough!!!!
I have made this pizza dough/breadsticks many many times! It always turns out great!
This has become my go-to pizza crust / breadstick recipe. I make pizza on a weekly basis and this is always the recipe I use! The breadsticks are absolutely fantastic! Thanks for such a great recipe.
My grandson’s love the cheese sticks
I love bread sticks and I need to work on my dough recipes. This looks like a good one to try.
I’d always been so nervous to attempt homemade pizza dough, but this recipe was so simple. My whole family loved it and I felt so proud of myself for branching out and making it!
These bread sticks look wonderful!
This pizza crust is AMAZING!!! (and so versatile!!!) 🙂
So delicious!!!
The only Pizza dough recipe I use now!
[…] here is that foolproof PIZZA DOUGH recipe I mentioned earlier. Happy pressure cooking everyone! Hope you enjoy as much as […]
[…] foto: laurenslatest […]
Can I use the normal flour instead of bread flour?
yes!
having difficulty printing this recipe
My new go-to dough! Thanks!!
I want to try this with my grandchildren. We would have to knead it by hand. Can’t wait
I’ve made your pizza dough recipe many times…..really turns out fantastic! Tastes like heaven. Thank you so much for sharing this recipe. Mrs. Windhom
pizza dough
Best pizza dough ever!! I’ve been using it for over a year now. Always turns out wonderful. Thanks so much!!
Gooood stuff
I do not want to bake my Pizza immediately. What are the exact instructions to hold in fridge for a day. Also how to prepared dough when frozen.
Thank You
Miss Alice
[…] Laurens Latest Fail Proof Pizza Dough and Cheesy Sticks Recipe […]
[…] I’ll be having too #nojudging. BUT, if you make it yourself that’s pretty fancy, right? This recipe from Lauren’s Latest is the bomb but my mouth is watering for this butter pizza. Or you know, […]
Hi! I found this while browsing pintrest. I always try new pizza doughs and am always disappointed. Namely the dough made with flour and Greek yogurt, YUCK! I tried this recipe today but I only had AP flour and quick yeast on hand. However, this recipe is AMAZING!!!! Thank you! I will now be more willing to make my own pizza!!
I like to get different recipes from other people
[…] Laurens Latest Fail Proof Pizza Dough and Cheesy Sticks Recipe […]
Made the dough and used half of it for a pizza and then the other half for bread sticks. I think I rolled it out too thin cus my bread sticks were a little flat and then I also burnt them cus I had my oven on 500°F but on a pizza pan not a pizza stone. I learned my lesson this time around and hopefully second round comes out better! 🙂
Thank you so much for this recipe, I’m super picky about pizza dough and judging from the pics, this one looks perfect. I’m going to try it soon!
I LOVE this recipe! The dough is perfectly chewy. It’s so easy and I’ve even used it to make soft pretzels! Thanks!
I love this recipe!! I’ve tried many other dough recipes & none of them turn out as good as this one does! I always have at least 1 batch in the freezer ready to go for pizza nite! Thanks so much for this recipe Lauren!!
We love making homemade pizza with bread flour too! I’m going to have to try the cheesy breadsticks recipe soon!!
I’ve made this several times and I love it! Thank you for the recipe!
The cheesy garlic sticks recipe is a wonderful, delishous recipe. So easy to make!
How easily can this be made without as stand mixer?
I would like to try this but I am terrible at making doughs ????
This was our summer favorite for Friday night deck parties! We would get the pizza stone super hot on the grill and throw the garlic bread on there and it is FABULOUS! Good memories – especially now that the temps are below zero!! Thank you!
Thank you for this recipe, it looks delicious
Pizza dough ..I love to make breads 🙂
I love cheesy bread and they took it off the menu. Now I can make my own. Thank you Lauren.
My favorite recipe for pizza dough and cheese sticks! We use this in our pizza oven and it comes out great every time!
This is my go to recipe for pizza dough now. I usually use half whole wheat flour.
I use your recipe every time we have homemade pizza! We love it! And it’s so easy.
You can NEVER go wrong with this recipe! This is a perfect kid AND adult pleaser! Love, love love it! Thank you!
This is my favorite pizza dough recipe! Works every time!
I love this fail proof pizza dough recipe! A friend shared this recipe and your site with me a while back. I have been using this pizza dough recipe ever since and my family loves it! The garlic bread is absolutely fantastic too! Thanks for sharing such amazing recipes.
This is my go to pizza dough. Its so simple and quick to make and turns out perfect every time. My husband and kids love this over chain pizza restaurants.
My 3 year old and I made this tonight, yum! My breadsticks were a little dry, but thats my fault. Not enough cheese 🙂 Loved how restaurantish it felt.
[…] Ingredients: Lauren’s Latest […]
[…] Ingredients: Lauren’s Latest […]
[…] Laurens Latest Fail Proof Pizza Dough and Cheesy Sticks Recipe […]
[…] this recipe […]
[…] as good as the restaurant style bread […]
I’m confused – is the printable recipe for 2 12-inch pizza crusts or just one? It says 3 cups of flour for cheesy bread or 1/2 pizza recipe – but I don’t see any other instructions for a whole pizza recipe. Am I reading it wrong? Thanks so much!
Love this recipe! Have made several homemade pizzas. I’m getting better at spreading it out and love experimenting with different toppings. My family is impressed. Thanks for sharing.
How in the world do you transfer this to the pizza stone?! Help! I just had an epic fail trying to transfer mine!
Just tried these tonight. So so good! Hubby loved them 🙂
[…] garlic bread?! It’s full of flavor, cheese, and it’s super easy to make! So I saw this recipe and decided to check it out. I thinned out the crust a little, because that’s just the way I […]
My mother and I tag teamed sunday dinner, she made Italian sausage rigatoni and I made your garlic cheesy bread to go with. Needless to say but I’ll say anyway, it was AMAZING! I’ll be using this recipe over and over again. Mind Blowingly Delicious!
If you put garlic on your pizza try brown the cloves in olive oil on the stove top it will take the harshness out of them.
I tried your pizza dough recipe and my family loved it. My question is can I make the dough at night and then refrigerate until ready to use in the morning? Thanks.
YES! Just make sure you grease and cover it well so it doesn’t dry out 🙂
[…] thinner, which is what I prefer unless I can get Giordano’s deep dish pizza. Mmm. Pizza. I used Lauren’s Latest Fail Proof Pizza Crust, which is delicious. It actually has honey and not sugar in it, which I love. Instead of using the […]
This is my favorite pizza crust I have ever found. It always turns out amazing. Thank you so much! And I’m obsessed with making the cheesy garlic bread every time!
Can this be refigerated and used the next day?
It’s so funny how you figured out what I’ve been trying to find !! That perfect crust. I am making this asap! Thank you ????
2nd time I made this dough. This is a great recipe. Every recipe ive tried it just not good enough. I will probably always use this one, thank you.
[…] Source: LaurensLatest […]
[…] Pizza Dough is found here at Lauren’s Latest. It is pretty easy and it does never fail! I have made this recipe many times and honestly it has […]
You mentioned in your recipe about a good time to freeze, but you mentioned dividing it into portions. Exactly how many 12 inch pizzas does a single batch make? Thank you in advance! ????
Oh dear,thank you very much…so perfect.tried it n it’s yummy ❤
Oh dear thank you so much ..this is sooo perfect.love the recepi..tried it n it’s yummy ❤
can i only buy a pizza base?
omg! I am so thankful I found your pizza recipe!
It is the best I have ever made and it is sooo easy to pat out into a circle you don’t even need a rolling pin. Thank you so much. Keep up the great recipes.
Sooo… How do I get the pizza off of the parchment paper? I made this and had to peel bits of paper off the bottom of each piece. It was a pain
Thank u! I used all purpose flour by mistake, yes turn out perfect! Again, Thank u!
I made my dough in my bread machine. After it was all mixed and kneaded, about halfway through the cycle, I took out the dough and put half of it in the freezor for later. I put the rest of it back in the machine and let the cycle finish with the warm rising. I made a sausage, onion and pepperoni pizza with a white pizza sauce and italian cheese blend. It was the best pizza EVER!!!! Love the recipe.
Will use it many, many times!!!! Thanks!!
I’m experimenting with different pizza dough recipes right now and this is the next one on my list. Do you need to let the dough rise after mixing before rolling it out. Thanks for all that you do. Love, love, love your recipes.
I made this tonight! It was amazing! The upside down cookie sheet worked perfect!
[…] this recipe […]
[…] Laurens Latest Fail Proof Pizza Dough and Cheesy Sticks Recipe […]
Hi…I have made these by hand (w/o the stand mixer) and they turned out awesome!!! Just wondering if/how you can fully prep these ahead of time for a new years eve party. I don’t want to be in the kitchen long. Can I make them in the afternoon and pop it in the oven when i need them. Thanks so much :).
This is a pretty good recipe. My two issues were 1: 500 degrees for 9 minutes was too long, 7 minutes probably would have been perfect; 2. I had issues rolling out the dough (and I did let it rest for at least 1.5 hours)
I rolled mine out on corn meal and it turned out great! I’ll definitely be using this recipe again!
Hi Lauren and Family, Just wanted to THANK-YOU for the Pizza Dough recipe and the cheesy bread sticks. Your right I will never need a pizza dough recipe after this one!!!! I”ve been using this recipe for over a year now. I even make my pan rolls using this same kneading method. I will be sure to check your blog from time to time. Lisa
I came across this recipe on Pinterest this evening and decided to give it a try. PERFECT crust! I threw the ingredients into my bread machine rather than my mixer and it came out great! No more $30 pizzas for my family! 🙂 Thank you for this!
Thank you for sharing this recipe. I have to try it. I love cheesy bread sticks.
I so want to thank you . I never knew bread flour was key to chewy pizza dough ,”tried and true” just made this dough recipe and it is great .
My daughter made this today and I managed to get a couple of slices from her boys who were inhaling it. THANK YOU SO MUCH for sharing your wonderful tips and for helping us to finally have the best pizza crust recipe ever in our family recipe box. We are awed by your skill and perseverance.
can i use all purpose flour or does it have to be bread flour
This looks delicious! Can I substitute gluten free flour mix for regular flour?
This is my first time commenting, but I just needed to tell you how much I truley love this recipe. Thank you
Thanks for the Recipe and the Helpful Hints.
I am so going to make the sticks!
This is an excellent recipe. Making bread, bun, pizza is always a failure until I met with this recipe. Thank you so much for this recipe. We have been enjoying pizzas and cheese sticks for the last three months since I found this recipe.
I have a question about the pizza dough. First it sounds great and I hope to try it this week. My problem is that I have a 4 oven AGA stove which I’m sure you know what I’m talking about. I cannot start cooking in a cold oven because I never have one. Should I cook the pizza crust just in my roasting oven or should I start in my warming oven and work my way up to simmering, then baking and then the roasting oven? I’m in a quandary as to which is best. I’m inclined to just cook it in my hottest oven. If you can give me guidance, I would be very appreciative. Also, I do have pizza stones. I love your site! Thanks!
Best pizza crust I’ve ever made or eaten. Thanks!
Oh, my word! Just made these with butter and Tillamook Medium Cheddar and Pepper Jack Cheese. They paired perfectly with a creamy tomato soup. Even the picky eaters devoured them. Thank you!!! Musn’t skip Zumba tomorrow!
This IS a very easy and tasty, light pizza crust!! Thanks a bunch for the recipe, I make a pizza with it every 1-2 weeks and it’s always a smash. Thanks again!!!
The recipe does not say the temperature or how many minutes! Please post it thanks!
I haven’t had great luck with pizza dough in the past so I didn’t feel confident when I went into trying your recipe. But I’m pleased to say that it turned out wonderfully and was just as easy as you described! This will definitely be my go-to pizza dough recipe from now on. Thanks so much for sharing!
Is there any way to make ans save this dough i want to take on vacarion and they don’t have a mixer there
do we have to use the full 3 cups or can we use 21/2 cups? i didnt understand the bit 3 cups bread flour {give or take 1/2 cup…depending on the heat & humidity}
Super excited to make this tonight! It looks absolutely delicious!
This is my go-to pizza dough recipe now 🙂 last night we had some friends over for dinner but one of them is gluten free so I made a half batch of this with gluten free flour for her. It didn’t rise at all but I rolled it out and baked it anyways. It worked so much better than expected since it didn’t rise one inch in 2 hours. My friend said it was the best gluten free pizza crust she’s had since she had to give up wheat! Thank you!
Hi Lauren,
Could I let this rise in the frig if I won’t be ready to make it in 1-2 hours?
Thank You!
yes, that’s no problem!
Looks yummy!! I have to try this one. One question, can this recipe be doubled? I mean without destroying my kitchen aid??
How big is your mixer? I have a 6 qt. and a 7 qt. and double this all the time, but haven’t ever tried with the 5 qt.! If you try it and there is enough room, make sure to mix is slowly 🙂 And if the dough starts to creep up into the gears, just remove the dough and finish kneading by hand.
Oh my god! I made this tonight, and I can vouch for how AWESOME this is.
I’ve made my own pizza dough for over 20 years, and I swear my cheesy bread has never tasted so good!
I’m not sure if it was the kneading or the baking stone or the fact that I actually threw it in the oven at 500 right from the start, but whatever it was – thank you!
My dough is rising as I type this. Can I cut it in half and freeze the other half. I’m just making the cheesy bread and could use the rest for another time. I’m correct that this makes 2 pizzas/cheesy breads, right? Thanks.
I have been looking for the answer for many many years. “How to make pizza crust at home that can rival that of a top notch pizza parlor. I have tried thousands of times (as I am also a pizza fanatic) with hundreds of recipes, both of my own creation and those of others. I believe I am pretty good at it, but something was always missing. You have nailed it Lauren! I just found your site and have made both a pizza and a batch of breadsticks. They were absolutely great! I never considered bread flour, but you are correct. It is the only way to go. Such a simple thing yet it is the difference maker. To those that question wether they can substitute other flours, the answer is no, don’t waste your time, as I have been for decades. Use bread flour and get a pizza stone if you don’t have one. After all, that’s why we all found ourselves here,,,to graduate from good to great. Thank you Lauren.
Amazingly easy recipe. Thank u for the directions! I followed them step by step. Will definitly repeat it.
Does it have to be bread flour? Can I use all purpose flour?
I have used all purpose flour with this recipe & it works out really well for me. The only problem I have sometimes is when I bake the pizza or cheese sticks the dough seems to rise a it too much but still very very very good! My family loves it when I cook this (however, I think that I just added a bit too much yeast I don’t think the type of flour I used caused it).
Can you freeze this dough for later use?
I want to try this for the Stromboli but I only have all purpose flour – will it work?
and I love your site! Thank you for sharing.
Yes, it will work just fine.
Hi, can’t wait to try this recipe!! that cheesy bread will be gone almost as soon as it gets out of the oven at my house! 🙂 question, will this recipe work in a bread machine? Thanks!
It is late at night, and I am suddenly wanting to make and eat pizza…. Oh pizza, why must you be so delicious?!
Thanks Lauren, just made it, and it turned out great.
oh….. God!!!!! Lovely and yummy recipe…… Thank you sooooooooo much. It had come out much better than the restaurant pizzas….
I made these cheesy breadstick before and they were so yummy. I made mine with double dough and extra cheese. They tasted like a double dough pizza with out the sauce.
Lauren – I made 2 veggie pizzas using your pizza recipe today. I had a bunch of 3-year olds devour it! Needless to say, it was a big hit and I will not order pizza anymore 🙂 Thank you for a simple and fantastic recipe!
When you make the pizza, do you precook toppings?
Hey guys a little tip, never add the salt to the yeast water always add it to the flour then to the yeast, the salt slows down the yeast growth.
how long do u cook he cheesy sticks??
Have you tried to freeze it?
dear thanks for sharing
Can i replace the active dry yeast to the instant one?
What about the bread flour can be replaced by the all purpouse one?
Thanks loads
I’ve got my pizza in the oven right now…I’m excited! I’m doing it on a PC baking stone, put it in a cold oven, & turned the temp to 500 degrees. No where did I see how long to bake it. I’ll start check at 18 minutes, but I was wondering how long you baked the pizza.
I was wondering for those of us who don’t have a stand mixer, approximately how long do we knead by hand? I have tried making my own dough before, and was fairly successful, but I’m just not sure I am kneading long enough. Of course I am also always afraid of over kneading… So any help here would be great!
Could you use all purpose flour instead of bread flour?
Yes!
Is it possible to freeze/save leftover dough? I only want to make one crust (or I’ll eat it all!)
Yes! You can do either.
Is it possible to freeze/safe leftover dough? I only want to make one of the crusts (or I’ll eat it all!) but don’t want to waste the extra.
Lauren, I have to put this on the list of recipes to try. 🙂 Thank you .
[…] Saturday night I made homemade pizza and salad. I love this pizza dough recipe here. […]
[…] Recipe from laurenslatest […]
I guess I should have read all 777 comments before I cooked mine because I took it off the parchment paper and put it on the back of my cookie sheet also don’t know how long to cook it
I literally only needed to see a picture of the dough to come to this recipe! I love pizza and this is definitely the next recipe i’m going to use! Thanks for sharing!
[…] your homemade pizza night and don’t forget to use this homemade […]
I made this last month. it was yummy. Now I want to make it again but make extra so I can make it for dinner AND have some for the freezer. can i just double it in one batch or will that bee too big for the mixer? Thanks for a great go-to recipe.
Hi, I just came across your website as I was researching how to make pizza dough and flat bread. I was just wondering. How come some recipes calls for bread flour and some for all-purpose? is there a difference? Are they interchangeable? I’m new at bread making but would really love to learn how to make pizza (especially your garlic butter cheese flat bread above for my boys…and MIL (to keep her happy). HELP Please!! Thanks in advance!!
Bread flour has more gluten in it. It gives a chewier texture to bread products in general. You can use all purpose in place of bread flour, but I’d knead the dough an extra minute to develop more gluten.
One of the best dough recipes out there. I’ve made it using this one for years.
I’m not sure if “Canadian” AP flour is different than American, but that’s all I’ve used over the years. I just proof the yeast….dump in the rest and let her rip.
The long kneading time does the trick. I made focaccia bread with it tonight.
Better than anything served in a restaurant.
My husband and I live in rural Northern Vermont. We lament not having our pizza place in VA that we’d eaten at for 20 years. I came across this recipe as I wanted something to go with the calzone we were reheating on a recent trip back to VA. …so I made this. I’ve never had good luck with pizza dough or bread sticks but I figured I’d give these a shot. WOW!!! My husband raved and raved and said to make these anytime….he won’t stop talking about them. Thanks for making this super easy and for sharing.
Someone else has jacked your recipe…you’ll see your photos on pinterest with someone else’s link. Just thought you should know! I have been using your recipe for a year and lost my bookmark for it, that’s how I found the fake!
xo,
Alyssa
Thanks for letting me know! Can you leave the pin link for me so I can track these people down?
Just curious. ..does this recipe make one 12 inch pizza cryst? I can never decide how much dough should go in one pan. Thanks.
Hello Lauren!
I’m planning on making a pizza from your recipe (it looks perfect!) but I’m not sure how much dough I will get. Your recipe says: 2-12 inch pizza crust – does it mean that I will get two pizzas, each 12 inch?
Thank you for answering,
Kasia
yes, that’s what it means!
Hi Lauren,
Can I divide the dough into small portions and freeze it? So when I want to bake them they are ready? If so, how do you suggest going about freezing the dough and the thawing process/baking process.
Thank you,
Vivian
Yes! You can freeze the dough in ziploc bags right after you knead it {before you let it rise}. To defrost, remove dough from bag and place into clean, greased bowl and let rise. Punch down and use as you like.
I have make this pizza crust three days in a row! I just can’t stop. It’s the perfect crust. Absolutely wonderful recipe!
This did not dissapoint – delicious & sooooooooo easy!
I’ve made this twice now and it is the best pizza recipe I have ever tried.
I accidentally let it rise for more than 2 hours the first time, and it was still amazing. It is super thick.
Both times though the dough was two dry so I had to had 1/4 – 1/2 cup water more as I mixed it with the bread flour.
I just had to review this pizza dough! I am a Chef, and even I have had a hard time finding a RELIABLE, NO FAIL, pizza dough recipe and have seriously tried them all. THIS recipe is the best I have ever made, and I now make it for my husband and I every sunday. I think part of the key to this recipe (besides seeming perfect measurements in the recipe) is the letting the machine kneed it for 6 minutes…that part really makes it perfectly chewy! SO GOOD!
i have made these bread sticks (taste great) however, I have never made pizza.Do have a recipe and directions for making regular pizza with this crust?
Id give it 3 stars, nothing went wrong with the bread itself, but me and my friends just didnt like the taste
I would like to start by saying this was absolutely fantastic!! I saw this post a while ago and saved it on Pinterest. I actually got my Kitchen Aide appliance partially because of this post. My husband is a pain about Pizza, he is for lack of a better word a Pizza snob. Very particular about his crust. I’ve listened to it for 30 years. When I saw this I thought I would give it a whirl, the comments were so positive and you were so very honest about your trial and errors in your research. I am an experienced cook but bread, crust, and the like has always given me pause. No longer, this was so fantastic, words escape me. He loved it, I loved it and our two boys will be thrilled. Love your blog but this one has made my day, what the heck my 2015!! I am planning a pizza party for supper bowl!!
Hi! I was just wondering if you have every tried to make it with Whole Wheat Bread Flour?
best ever !! I missed the part where the parchment paper actually went into the oven on the pizza stone so my bottom wasn’t as crunchy and so my cheese burnt slightly as I was trying to get the bottom crisp I still think it was delish !! can’t wait to try again.
if you use cold water the dough will take longer to rise in the frig, approximately 1-3 days and resulting in a better flavor dough.
Just wondering if you could replace the flour with gluten free flour and xathnax gum and get the same or similar results
I’ve never tried it with gf flour, but you are welcome to try 🙂
This looks so yummy
hello…I never ever ever comment on anything but I had to for this! I saved this recipe about a month ago and finally got around to trying it last night —– it is actually truly the best pizza dough recipe ever in life lol I ate half the pizza by myself last night and don’t feel guilty about it at all! I also froze half the dough to make the cheesy bread this weekend —- honestly the pizza was so good that I couldn’t even believe I made it lol! thank you so much for this recipe! I’m going to use it forever.
DANGER- Do Not Follow The Advice To Walk Away For Six Minutes!!! You COULD SERIOUSLY INJURE A CHILD OR PET!!!!
I walked away just six feet to sit down at my kitchen table to grab a bite to eat and 4 minutes heard a CRASHING SOUND! Turns out it was my mixer crashing to the floor! The mixer caddywalked from the back of the counter all thevway to the edge and fell off, luckily a child or pet were not below on the floor!!!
Now who’s gonna pay to replace my mixer now that its broken?
if I don’t have bread flour can I use normal Robin Hoods flour?
It turned out perfect. Thnx
Its toooo yumm. I made it today it turned out extremely delicious, soft. The pizza ever. Thnx for the receipe.
This looks amazing!! I have a question though I haven’t tried making dough yet so this will be my first time. For the kneading I can’t do it by hand right? What mixer brand should I buy? Thank you!
What kind of pizza stone do you use? Can you point me in the right direction please.
Any pizza stone that gets good reviews. I don’t use a pizza stone, just an upside down baking sheet that preheats in the oven.
For pizza oven temperatures and how long to bake, thanks
So… how long do you knead it by hand? Some of us are poor and don’t own kitchenaid mixers.
Omg these were the best ever! I hadn’t found a pizza or breadstick recipe I like till how… Best part sooooo easy! I used King Arthur ap flour and parchment paper on a cookie sheet bottom. I was worried the 500 he’s at would burn but nope perfect at 9 minutes! Thank you thank you thank you great recipe!
AMAZING! I had been trying to figure out the perfect pizza dough for a few weeks now and then I saw yours. This is it. I’ve made it 3 times in 3 weeks and I feel like I’m definitely getting the hang of it (I had no idea how much bread flour can change a recipe, or how good a pizza stone would work). Don’t rush the dough process! Wait until the yeast and water bubble, add the flour bit by bit, and make sure you let the mixer go for 6 minutes, it’ll be perfect. My crust comes out chewy, with a nice golden brown bottom. Thanks for the recipe, my family keeps demanding pizza night now!
Hello, I tried this for the stromboli with turkey and halloumi, it turned out great, it was soft and delicious. Everyone loved it!
I was just wondering if I could use this same dough to make bread
Thank you 🙂
May I use the standard flour instead of bread flour?
Can this be put in a bread machine and use dough cycle? Sounds delicious
yes!
Just made pizza dough for the first time and wow what a recipe. Made me look like a pro.,
I’ve just made and finished your recipe. OMG !!!! Delicious and I’ve looked like forever for a receipe like this 😀
You’ve made me and my wife very happy today 🙂
Lauren,
Can I make this one day and prepare the pizza the following day? Will the dough keep in the refrigerator one day?
Thanks
Yes!! Just cover it with plastic wrap in a greased bowl. Should keep up to 3 days in the fridge.
Hi, I can’t wait to try these. I grew up eating this sort of thing from local Pizza places and have tried many times to replicate them. Your picture looks like them so I can’t wait to try this recipe. Thanks for the tip about the cookie sheet gonna try that too!
Thanks a bunch
Tina
Made the breadsticks today. Simply awesome! Thank you for your time and expertise. Much appreciated!
How long do you leave in the freezer until u ready to take it out
Making another batch of this dough today. I freeze it and pull out to make pizza hotpockes, mini pizzas and cheesy bread.
The cheesy bread is amazing. My husband and children ask me to make it more often.
Sooooo easy to make this.
Keeping this recipe FOR EV ER. 🙂
Hi I was just wondering… How long are we supposed to bake the cheese sticks for?
[…] about 1 lb. of pizza dough and spread it onto a baking sheet sprinkled with cornmeal. {Or just use parchment paper.} Spread […]
Could I make the Pizza dough in my breadmaker?
yes!
How many minutes to bake the Cheese Bread? 8 minutes????
Thanks for the recipe–iit’s great!!
8-10 minutes until browned hot and bubbly!
I haven’t gone through the 12 pages of comments, so my apologies if this has been asked. Can this dough be refrigerated and or frozen? If so, how long in fridge and do you recommend vacuum sealed when frozen? Thanks!
What do you do if you don’t have a pizza stone?
[…] grab some fail proof pizza dough {I had some left over from a few nights back that I pulled out of my fridge} and bring it to room […]
Hi, looks amazing.
Is it possible to make it half whole wheat? How would I tweak the recipe, or don’t mess with it 🙂
Yes, it’s possible! You’ll want to add in the whole wheat flour first and then slowly add in the other half of bread flour with the mixer on. You probably won’t need as much, so just add it in little by little.
I have never tried honey as the sweetener, I might need to try that the next time I make pizza dough. Does it change the flavor? Depending on what I’m making, I may add garlic and oregano to the dough.
[…] start by making my favorite pizza dough recipe. (This also works well using half wheat flour). Love this […]
Hello,
I want to try your delicious recipe, but I am a little confused about the baking part.
Your pizza instructions say, “Put it in your cold oven, and then crank that baby up to the hottest temperature it will go to. For me, it was 500 degrees.” But you also instruct, “Preheat oven to 500 degrees with pizza stone inside.”
Do you mean that I should put the pizza in a cold oven, but when making bread sticks, I should put them in a preheated oven?
Thanks!
Hope
If you have a pizza stone, preheat it with the oven, then transfer the pizza over to the hot stone once it’s preheated. If you don’t have a pizza stone, wait to put your pizza into the oven until it’s preheated.
Thank you for taking the time to clarify this for me.
I don’t have a pizza stone, but it sounds as though the pizza is fabulous even without it. I am really looking forward to making this!
Love your site.
🙂 Hope
Yeah!!! Just like Pokey Stix from college days. YUM!
Lauren, this looks quite perfect..
Mine was a mess .. My dough did not rise at all..
Can you please help me figure out what went wrong !!
Look into Donair sauce. It is an East Coast Canadian sweet sauce that we dip our “Garlic Fingers” into here. 🙂
Hi Lauren! Can this be prepared ahead and just store in the freezer? It really looks so yummy!
Thanks. 🙂
yes!
Just made this. Very good recipe!
This is my go-to pizza dough recipe that I make every week without fail and know the recipe by heart. I always get compliments on my pizza and only have you to thank!
You’re welcome. 🙂
HI,
I found you on Pinterest and tis sounds fabulous. I too struggled for years to come up with the perfect pizza dough recipe. I haven’t tried honey, I like that idea, I think I’m going to try that. I use King Arthur Flour Perfect for Pizza flour and oh MY! It’s better then the bread flour – give it a whirl. Thanks for sharing. Lisa
Ooh!! Will do 🙂 Thanks for the tip!
[…] Source: Adapted from Lauren’s Latest […]
[…] Cheesy Garlic Breadsticks https://laurenslatest.com/fail-proof-pizza-dough-and-cheesy-garlic-bread-sticks-just-like-in-rest… […]
has anyone tried making cinnamon sticks with this recipe? if so recipe would be helpful 🙂 thank you in advance!
[…] Lauren’s Latest – Fail-Proof Pizza Dough and Cheesy Garlic Bread Sticks […]
[…] batch of this Pizza Crust from Lauren’s Latest (the best one I’ve found. Get’s nice and crispy on the fire! The recipe is enough for 2 […]
[…] make cheesy bread sticks with it as well. Which I think I will have to make sometime soon. Here is Lauren’s Blog with some amazing […]
[…] Inspiration: Lauren’s Latest Recipe: Fail-Proof Pizza Dough and Cheesy Garlic Bread Sticks […]
Butter! That’s the one thing I’ve been missing. I use olive oil and garlic, and it just doesn’t taste the same. Excited!
I never thought of rolling it out on parchment paper. You are genius!
Just wanted you to know I love this recipe. I use it for so much more than just the pizza/cheesy bread… I’ve made dessert pizzas, cinnamon rolls, monkey bread and even doughnuts. Thank you do much for sharing it. (When making desserts I do add extra honey for a slightly sweeter dough).
[…] my favorite pizza dough recipe, you need to check out fellow blogger Lauren’s Latest and her Fail-Proof Pizza Dough recipe. It seriously is fail proof! We’ve made it over a dozen times and love it! Even when I […]
[…] Fail-Proof Pizza Dough & Cheesy Garlic Bread Sticks […]
If you wants to make this ahead for a party or gathering how would you do that? Make completly then freeze and re-heat or ???
I would make the dough and before you give it a chance to rise, pop it into some freezer bags and freeze. Then you pull it out to defrost, rise and make into pizza or garlic breadsticks.
[…] https://laurenslatest.com/fail-proof-pizza-dough-and-cheesy-garlic-bread-sticks-just-like-in-rest… […]
Been making a lot of pizza lately. Was thinking about making calzones and this tonight. My problem has been overmixing. Bread flour and mixing it too much seems to produce a tougher crust for me. Maybe my oven isn’t hot enough, or not using a stone, like she said. Whatever, I just mix it a little less and it comes out a little crumbly, which is fine for my family, and then add a little butter on the exposed bready parts to soften them a little. Delicious, and everyone eats good here at our home.
So which brand of active dry yeast did you use please ?
Is it different from the instant yeast ?
Thanks
– Rupa
I typically use Red Star Rapid Active Rise Yeast. Their Platinum yeast is also amazing!
Can you use all purpose flour for this recipe? Or should I stick with bread flour?
Yes, you can! Just knead 1 extra minute.
Fail-proof is right! I’ve tried other recipes and failed miserably but this one though…One try and it’s perfect! Thank you so much!
It’s grillin’ time! Have you ever tried cooking this on a grill? What would you recommend? Thanks 🙂
I did this yesterday, and oh my God the bread sticks were good! Pizza dough was good too, but the bread sticks were amazing! And that’s a great tip on the parchment paper! Made it so easy, and I did use the pizza stones and the peel. Thanks!
OMG! this looks so delicious! I only have 1 question. I usually make a lot of pizza (yes I am addicted too) my dough is usually very soft and I don’t roll it with a rolling pin, I ususally do it with my hand straight on a non stick tray brushed with oil. Now I have bought a pizza stone but I haven’t used it yes as I don’t know how to roll my pizza on it -__-‘ how do u do it exactly?
I have never used a rolling pin for my pizza dough. Usually for pizza stones, you heat them up in the oven and then transfer the pizza over to it. So, make your pizza over a floured board or one sprinkled with cornmeal. It is good to use to prevent sticking and a pizza peel is used for transferring. If you don’t have a pizza peel, you can always use parchment paper, albeit tricky. Hope that helps!
I just made your stromboli using this dough recipe.
Turned out so yummy. My kids ate it for dinner and said they want to have it for breakfast the next day. Thank you.
Do I let the dough rise at room temperature or refrigerate it?
Room temp!
Trying to learn to bake. So far it’s not going well. I live in Denver, the mile high city. Are there any adjustments I need to make to the bread recipe for altitude?
[…] had some delicious successes. My most recent success is this mega tasty pizza dough. I made this pizza dough recipe from Lauren’s Latest. My mixer looked like it was going to walk off my counter while […]
Do you roll your dough out with a pin,or stretch it with your hands,when ready to shape? thanks
I use just my hands!!
Not sure if this was asked already, but can this be made ahead of time and frozen? I’d like to make 2 batches…one for now, one for another day?
Yes you can freeze the dough no problem!
Although I made this numerous times before without any problems I was SURE that I had actually failed the fail-proof dough tonight… It just wasn’t getting to the right consistency and I felt like I had then added way too much flour and that it was going to be very heavy. (The dough seemed heavy!) Even though I didn’t get it to the not-sticky consistency that I needed I stopped with the flour and just let it rise… I kept checking on it and going “it’s too sticky.. It’s not going to work…” Welllllll. It seems to be okay! I guess this really -is- fail-proof. =]
[…] Make my own pizza dough […]
My all-time favorite pizza crust recipe!! Even my picky husband loves it!! Thank you! Thank you! Thank you!!!
Thank you thank you for posting!! I’ve made this twice now and you’re right, it is fail-proof. My first successful adventure with yeast!! I’ll be poking around the rest of your recipes for sure 😀 DELICIOUS!! I served to my husband and 2 friends and I almost didn’t get any, they disappeared so quickly.
[…] dough was revised from here, and the remnants of it to make into little buns. Recently, I’ve skipped making pizza […]
These were fantastic!! The whole family gobbled them up! Thank you!!
Hi, What if I do not have a mixer and “knead” to mix it by hand? Will this still work? Sure hope so!!
Yes, it works just as well if you knead it by hand!
I have tried it tonight and it turned out to be the home made pizza I’ve ever head! never ordering pizza again 🙂 thanks!!
quick question,did you roll your dough out with a pin,or stretch it with your hands,when ready to shape?thanks
[…] made Fail-Proof Pizza Dough from Lauren’s Latest, except I accidentally added 2 Tbsp of salt instead of 2 Tsp… more on that […]
I was wondering what the best method would be to store these. I would like to make a bunch of these the night before a party. Should I just make the dough and store in the fridge? Should I make the whole pizza and store in the fridge? Should I separate all of the toppings and throw on the dough right before I bake? Any suggestions??
What if I want to make a bunch of these the night before I serve them? What is the best method to store them? Should I make the whole pizza and leave in the fridge? Should I separate all of the toppings and throw them on the dough before baking. Anybody have suggestions?
I have started eating healthy and was wondering if whole wheat flour
Could be exchanged for the bread flour and would I need
To add anything else if using whole wheat flour
If you’re going to substitute different flours out, I would only do a 50:50 ratio.
Would it hurt to use all purpose flour??
no, just knead an extra one minute.
I am wondering if there is a way to add cornmeal to this recipe? Sometimes I want a cornmeal pizza crust. Have you ever tried to incorporate it?
no I haven’t but that would be super yummy!
love your instructions and very useful
Hi, Like the addition of honey rather than sugar!
Only thing I would change is adding the salt to the yeast, salt will retard or kill the yeast making it less efficient, add salt to the flour and add at the same time as stated in the recipe.
Hi Lauren, if I want to make just one pizza will i get the same results if I split the ingredients in half.
yes!
Hi Lauren
If I want to make this for 1 pizza (it’s just the 2 of us now that the kids are gone) if I split the instructions in 1/2 will I get the same results ?
[…] Fail-Proof Pizza Dough and Cheesy Garlic Bread Sticks {just like in restaurants!} | Lauren’s L…. […]
Love pizza and cheesy bread; thank-you for these step by step instructions. I have had the same issues; either too sticky or too heavy.
Will using all purpose flour make a big difference? Is that ok to use?
The dough might not end up being as chewy, but it should still work!
I made this pizza dough the other night, and it was absolutely amazing! It behaved so well (none of that obnoxious springing back business), and tasted wonderful! It truly is the best pizza dough we have ever made, and produced the best homemade pizza we have ever had too. Thanks so much for sharing the recipe! 🙂
hi i justwanna know if i can do this in a skillet with the same result? thank you..
Lauren, did you ever try to make this with a mix of whole wheat and bread flours? My wife has some issues with 100% “plain” wheat flour, but she feels better with crusts that include some whole wheat. The problem is, most whole wheat pizza recipes I’ve tried (even ones with a blend of whole wheat and “regular” flour) leave the dough sticky and hard to work. How much of the bread flour do you think I could replace with whole wheat flour and still get good results?
If you do half and half, I think it should work just fine. If it’s sticky, add in a little more all purpose flour. Or, have you ever tried white whole wheat flour? It’s the albino version of whole wheat!
I can’t wait to try it! I’ve had a pizza stone I’ve had stored up in my pantry for like forever……so excited to finally use it! Thanks for sharing your recipe Lauren! 🙂
[…] would have caramelized it more. Oh well, still was delicious. Will definitely make this again. 17: Pizza Dough I made this while I was house sitting because my sister has this awesome electric mixer which was […]
[…] Lauren’s Latest – Fail Proof Pizza Dough and Cheesy Sticks Recipe […]
According to a conversion chart, 1 lb. of cheese is 4.5 cups. So you only use 1 cup of mozzarella cheese on this? If not, how many CUPS do you use?
I just made your cheesy bread, and it turned out AMAZING!! We will definitely be making some pizzas soon! Thank you Lauren 🙂
By far the best pizza crust recipe I have ever tried! Just thought I would point out that my reynolds parchment paper is only heat safe to 420 degrees. Thanks for a great recipe.
[…] A and I are making these cookies tonight. And homemade pizza. […]
We make pizza every Friday night as a family. We try lots of toppings, different crusts, etc to change it up. But this is definitely our ‘go-to’ pizza crust recipe I keep coming back to. It’s never failed and always pleases everyone who tastes it!
[…] are a bit complicated and has ingredients that are not available here… until I stumbled upon Lauren’s Latest fail proof pizza dough recipe. It was very easy to make and you only need 5 ingredients to make the […]
[…] GARLIC BREAD (adapted from Lauren’s Latest) […]
[…] Fail Proof Pizza Dough and Cheesy Sticks Recipe […]
[…] 1 recipe worth of this pizza dough […]
This dough was nasty, don’t do it. You will be better off purchasing a pre mixed batch from the store.
Can you make this dough ahead and freeze or place in your fridge?
[…] fresh rosemary. Or dried, I guess. They’re both rosemary. Chop that up. Now grab some pizza dough, spread it out, drizzle on some olive oil and garlic powder, then top with some cheese, the […]
Tested and approved by my focus group. Ages ranging from 7 – 53. Thanks for sharing Lauren.
I made pizza using this crust tonight and it was awesome!!! We are from St Louis and are accustomed to a thinner crust. Would using less dough and spreading it thinner accomplish this?
That plus a hot hot oven should do the trick!
Hi,
I have made this many times for my family and it always comes out great! Aside from always setting the fire alarm off when cooking at such a high temp, this is becoming a staple meal, lol.
Quick question…can I double the recipe?
Thanks again for the amazing recipe!
Rachel
Yes! Double or triple it!
[…] Source: laurenslatest.com (you can see step-by-step pictures) […]
Such an awesome recipe!! LOVE homemade pizza.
[…] Lauren’s Latest – Fail Proof Pizza Dough and Cheesy Sticks Recipe […]
Hi, I’m going to try your bread sticks today, I was just wondering that seeing your a pizza fan, would you happen to have a really good recipe for pizza sauce? Thanks a bunch 🙂
No, not yet!! I’m working on it though 🙂
[…] have two dough recipes that I like. If I’m home and have a couple hours before dinner, I use this recipe from Lauren’s Latest. My one suggestion: the “warm water” she suggests should be […]
[…] Lauren’s Latest – Fail Proof Pizza Dough and Cheesy Sticks Recipe […]
My dough is rising right now – I’ve been wanting to make this forever. It’s the first thing I’ve cooked in my first house. 🙂
I can’t wait to try this out!!! It doesn’t look as scary or tedious as I thought pizza dough would be.
Im not sure if my oven is too strong, but the cheese was so crispy its coming off the crust! doesn’t quick look as wonderful as yours :/ Maybe i didn’t use enough cheese? Otherwise it was still delicious!
Was your pizza closer to the top of your oven or the bottom? Sometimes if it’s too close to the top, it can get a little toasty.
Awesome. Used my pizza crust I’ve adapted from many long hours (and 3 months of work). Simple and easy.
Hi Lauren,
I was trying many techniques for pizza crusts over the years. I was about to give up when I had a craving last night and came across your recipe. It is perfect…just perfect. Thank you thank you thank you.
Found this recipe a few days ago and just tried it tonight to make homemade pizza. This is the MOST EXCELLENT pizza dough I have ever made and I’ve been searching for a perfect dough for a looooooong time. Will probably not be visiting the local pizzeria very often now. Thank you!
[…] Photo Credit: Lauren’s Latest […]
Nice ! Excellent recipe !
Thank you for sharing the recipe. Actually I love and addicted to pizza too. I like it with salad, simple and more healthy food. Nice job.
Thank you.
Chui Sin Min
What stage do you freeze this? And what/how to thaw it?
Freeze the dough as soon as you’re finished kneading it. To defrost, remove from the freezer, let come to room temp, let rise, punch down and use as you’d like.
[…] and this is THE ONE! I knew it after my very first bite. You can find the original recipe over at Lauren’s Latest. She’s got some really great pictures and tips for making pizza dough so please check it […]
I just used your dough recipe to make pizza tonight and wanted to let you know after a week of dough fails, your recipe was simple and made an awesome pizza!
Awesome! Glad it worked for you!
failed miserably…dough stuck to parchment paper and never fully cooked. the dough itself had decent flavor though, will try once more
Wow, when you said no fail, you meant it. I have tried and failed so many pizza dough recipes and this one is by far the best!!!! I have so many ideas for this! Thank you so much for sharing such an amazing and flawless recipe!!
[…] Recipe: Fail-Proof Pizza Dough and Cheesy Garlic Bread Sticks just like in restaurants! […]
I have this dough proofing in a warm oven, I can’t wait to try it!
[…] Source: laurenslatest.com (you can see step-by-step pictures) […]
When you say warm water can you tell me the temperature for cheesy Garlic bread sticks. Many thanks
105 degrees is perfect!
[…] Image Credit: Laurenslatest.com […]
Mixed the dough in my bread machine. Breadsticks turned out great! This recipe is a keeper!
I just found your page via FB today, and this pizza dough recipe came through my feed. I tried it tonight and it was FANTASTIC!!! It came out perfectly. And the upside-down cookie sheet trick is amazing! Thank you!
Could I make this GF by using a gluten-free all-use flour dough?
I’ve never made this with gluten free flour, but you are welcome to try!
Once you cut the pizza into squares like that it is no longer pizza and should not be called such 🙂 Its an abomination.
[…] For more details please visit this link were you will find instructions: laurenslatest.com […]
This is quite excellent. I was worried about the water to flour ratio, but it was really quite perfect. It’s hard to get good pizza out here, and the recipe I was using required day-in-advance prep. Not really doable when you have a pizza craving.
This is the most amazing recipe for pizza ever. We now have homemade pizza nights at our house. And if we do it often enough, We can use and re-use all the toppings from one shopping trip. thank you!!!
P.S. haha if the cheesy garlic bread sticks turn out good. I want to make pizza using this recipe. 😀
I just love your bread recipe’s and just recently got a kitchenaid mixer. I can’t wait to try this one! But, I just read the hassle back cheese bread (which I am also going to attempt! lol) But, in it you said not to turn it up past level 2 on stir. What should I use? Also I don’t think that our store (small town) sells garlic butter. I wish they did! How much garlic powder I presume to the butter.. salted or unsalted if I make my own? Thank you, for posting these! 🙂
These were amazing and I will be making them a lot! I had a tub of the garlic butter from Papa Johns and used that to spread on the dough before the cheese, and that made them taste identical to their cheese sticks. The dough was kind of hard to work with though. It kept wanting to shrink back to it’s original shape. Do you have any suggestions on getting the dough to work better?
This was the year I tackled truly homemade pizza with homemade crust and everything. I’ve used recipes of yours in the past, so I knew that this was the recipe to try…I’m sittings here eating, hands down, the BEST homemade cheese bread and pepperoni pizza that I could ever make…thanks for making something that seemed so daunting, easy as can be! This recipe is going in my favorites!!
Just made this, and it’s about to go in the oven. I hope it looks (and tastes) as good as yours does 🙂
This sounds delicious and I love the idea of freezing it!
xx
Kelly
Sparkles and Shoes
[…] Recipe from LaurensLatest.com […]
LOve it! Will be trying it this afternoon. Just a simole question. I have a pizza rotating oven Does the instructions change a bit for that kind of oven or do i keep it the same?
No, I think things should stay the same for the most part.
Yes…this bread is as amazing as it looks! My whole family loves it. I even plan on bringing it to my next staff party at work to share the love! I do not have a kitchen aid or any fancy machines so my dough was done by hand. Very easy and quick to prepare the dough! I first made it with parmesean and mozzerella then the second time I used aged white cheddar and a little bit of sharp cheddar. Both times were amazing! This recipe is fabulous! Making it for my third time now…dough has another hour to rise. Cant wait!!
Thank you for this recipe! I have used it several times and they turned out perfect every time.
Garlic Fingers are also best served with Donair Sauce!
2/3 cup sweetened condensed milk, 1/4 cup vinegar, 1/4 tsp garlic powder.
Sounds really weird but I PROMISE its delicious!
[…] while back I found a great pizza dough recipe (Lauren’s Latest) and made garlic bread with it. I used it with this pizza and it worked so […]
I made this the other week, so easy and my friends loved it! Going to try the dough tonight for a pizza!
can this dough be frozen… or put in fridge to use next day?
Yes, you can freeze it or keep it in the fridge for up to 3 days as long as it’s covered well!
thank you!
[…] First off, let me preface this by saying that yeast breads and I don’t mix. I can never seem to get the dough to rise and it ends up being a hard brick of nastiness. I found this recipe on Pinterst though and lo and behold, I can make an awesome pizza crust that rises like it’s supposed to. I love the texture of the crust and it’s been on the menu several time since I discovered it. The recipe is over at Lauren’s Latest. […]
Lauren, thank you so much, I never dreamed of adding honey instead of sugar. But it’s the bees knees!!!! My hubby, just loves anything pizza and I’m his number one pizza making hero. 🙂
Oh my delicious!!! Can’t wait to try it for my hubby who is a fan of cheesy bread stix! Thanks for the recipe! Great photo you have there 🙂
Thanks for making me look like a pizza baking rock star! I made one pizza with left over bbq pork & pineapple, as well as the bread sticks,. They were both amazing – thanks!
I found this recipe after an internet search. It is perfect!!! My entire family was amazed. Thrilled to have found this treasure of recipes!
Hi! my perfectly looking dough is currently rising over the counter: ) But since I’m planning to use it until tomorrow , should I let it rise for 2 hours then punch it down and stick it into the refrigerator? I’m kinda lost here..HELP pleaseee?!
I love this! Hope you don’t mind me sharing 🙂 I’ll link back to you!
Could this dough be prepped and frozen to use later? If so, would you freeze it after kneading and before it rises? Thx!
[…] fucking hoot! Her photos on Instagram always crack me up. For my pizza dough, I use her recipe for no-fail pizza dough, and I’m telling you, it has never failed me. I was going to take photos of this recipe, but […]
I have tried so many pizza recipes since moving 4 years ago and this is the first one that works at this crazy high elevation! ( I grew up at about 100 feet above sea level and now I live at 4500 feet. My baking has never been the same.) Thank you so much! Every other recipe I’ve made, I’ve had to almost double the flour content, but this was PERFECT. I added less than a half cup extra, just sprinkling the surface when it started to stick to my hand as I was kneading. Thank you for sharing!
[…] garlic bread?! It’s full of flavor, cheese, and it’s super easy to make! So I saw this recipe and decided to check it out. I thinned out the crust a little, because that’s just the way I […]
Fabulous! Made these for dinner tonight in the UK – so good, thank you.
I can’t wait till I make this
[…] using regular yeast, my favorite recipe is from the website Lauren’s Latest. The ”Fail Proof Pizza Dough” recipe does need rest time, so you have to plan ahead, but the end result has great flavor […]
I made this for my friends, they loved it!
OMG I made these just now and they are so good! I shared your link on my FB page, https://www.facebook.com/pages/Mama-Ging/128148934040816.
Definitely will be pinning to keep this recipe! ~ MamaGing
Every Friday is pizza night at my house and I use this recipe every time! Thanks for sharing it with us!
Found this on Pinterest and it’s FABULOUS!! I’ve got a new favorite pizza dough!
Can I use my bread machine?
I’ve made this numerous times & it’s always a hit. Love the cheesy bread. Decided to check to see if the dough could be frozen & found the answer in the comments. Yay! Btw, my brother-in-law who managed pizza restaurants for about 20 years was impressed with the crust when he was visiting. I made it with 1/2 wheat flour & it was really good.
What can you substitute for the oil?
Melted butter.
do you transfer the pizza onto the stone with the parchment paper intact or pull it out from underneath the dough before baking?
I keep the parchment paper under the pizza and don’t pull it out from underneath. If you want to pull it out from underneath, use cornmeal!
[…] garlic bread?! It’s full of flavor, cheese, and it’s super easy to make! So I saw this recipe and decided to check it out. I thinned out the crust a little, because that’s just the way I […]
Amazing dough! Loved how smooth and silky the dough became. Delicious! I made both the pizza and breadsticks!!
[…] i came across this recipe from Lauren’s Latest for Fail-proof pizza dough I had to try it. Guess what-it actually worked! Even though it said to use Bread Flour and I only […]
Ok, just gotta say, i’ve made this recipe more than a dozen times now, and it comes out perfectly every time!! I used all purpose flour and it works great, thanks for this awesome recipe!!!
[…] start by making my favorite pizza dough recipe. (This also works well using half wheat flour). Love this […]
I just made the breadsticks and they looked wonderful. However, to me they tasted like regular homemade bread only thinner with garlic and cheese. Was really hoping for the pizza crust consistency and taste like commercial ones.
Try kneading the dough a little longer and using a pizza stone or my cookie sheet trick. That should help! Good luck!
We LOVE this recipe! Do you think it could work for a deep dish pizza?
[…] Here’s the recipe I use for pizza dough (only substituting half of the white flour for whole-wheat) or you can just buy frozen dough. I used a pound of dough in this recipe, so it made a pretty large pizza with a thick crust. (I like the crust to be nice and thick, not thin.) […]
[…] your homemade pizza night and don’t forget to use this homemade dough.Pizza SauceAdapted from: Taste of HomeYield: enough for 2-3 pizzas4 plum/small […]
[…] about 6 months ago….I will never go back to buying premade pizzas! Here is a recipe from Lauren’s Latest that is easy to make and makes great pizza […]
I’m allergic to garlic but I really want to try this recipe. Can I make it without the garlic? Thanks
You sure can….but it might not be as flavorful. Still good, though 🙂
[…] Pizza Dough (recipe here) […]
I work at a pizza place, and this is pretty spot on as to what we do!
This looks soooo amazingly good!! =). Can’t wait to try it! I unfortunately do not have a stand mixer (yet!) so I’m assuming I could just knead the dough for the same amount of time as if I were using a stand mixer, yes? =).
Thanks! =)
Yup! Just knead by hand 🙂
I had cake flour and used 1/2 cup of regular ap flour and turned out fabulous!!! My kids loved it!!! Yummy!!!!!
Just made the breadsticks! It was AWESOME!!!!!!!!!!!!! Thanks for sharing!!!
We love homemade pizza and this dough recipe is really good. I make it often.
Hi! If I wanted to make a few batches and freeze the dough, should I freeze it before it rises? or after it rises? Can you freeze it?
I would freeze it right after it’s done kneading before it has any chance to rise. I usually make a double or triple batch, divide the kneaded dough into 2 or 3 balls and place them into large freezer bags. Take out as much air as possible and stick them in the freezer flat. They should last 2-3 months as long as your freezer bags don’t give out!
Oh thank you I can never make it right either and I see why by your instructions what i am doing wrong I will be using you method real soon thankt again
omg i have been looking for a recipe like this my boys and i love this and i hate just ordering just that from local pizza place. thank you for saving me time.
[…] [photo credit: Lauren's Latest] […]
Hi. I was wondering if i could need this by hand. I dont have a mixer and I dont want to go out to buy one. Also i couldnt find bread flour could i use all purpose?
[…] slightly adapted from Lauren’s Latest […]
This is my go-to no-fail dough recipe. Thank You SO MUCH for sharing it!
I made pizza with this yesterday and it turned out great. I’ve always been scared to try a pizza before, but not anymore! thank you!
This recipe was right on! Made the pizza recipe and used half for cheesy pepperoni mushroom green n red pepper breadsticks and they were to die for. The other half I used for a medium sized pizza the same. It was so good first try. Thanks for a great recipe!
[…] Tuesday: Pasta, salad, Cheesy breadsticks […]
Lauren~ thanking you so much for this receipe. l did the pizza and the crust was so tasty my hubby and l loved it! l still have to try this dough into the garlic sticks, l’l let you know of how l made out! Love your site and thanks again for sharing! 🙂
I made these tonight. They were soooooo yummy! Turned out exactly.
pizza dough recipe is easy and looks delicious….. bookmarked this recipe and will try when i get time…
[…] Tuesday: Pasta, salad, Cheesy breadsticks […]
Thanks for sharing. I love pizza. I could eat it every day. I’ve started making my own with self rising flour but I don’t like how it turns out that well. I pinned this. Hope that’s okay. Can’t wait to try it.
I tried this recipe tonight and it is amazing! Can you freeze the dough?
Yes you can. I use half of the dough as per the recipe and freeze the other half in a freezer bag. I defrost it at room temperature, but you’ve got to be careful to use it, or refrigerate it when it defrosts, as it rises again.
This was the first time I’ve ever made garlic bread and it was absolutely divine. Most of it had gone (or been claimed) before I even got to the table with the rest of the meal. The only thing I would change is that I wouldn’t put on the optional salt and pepper – it didn’t need it.
This is a great recipe! I have used it many times. I wanted to let you know that when I went to go print it out(lost my last copy!) that the “Pin It” button pops up and covers the print button, and so I had to copy the recipe and put it in Word to be able to print it out 🙂
hello im very busy mom work 2 jobs i have a ? can i make these dough and freeze them ahead of time before pizza night?
This pizza dough is great. I have made it 3 times since I bought my KitchenAid mixer. It is a much better recipe than I was using with my bread machine.
Am trying this right now. Similar to one my husband had from Jr. High home economy class. Especially can’t wait for the cheesy garlic bread!
[…] For the pizzas, I use a recipe from Lauren’s Latest. It is super easy and quite delicious. It uses water, yeast, honey, salt, olive oil, and bread flour. Lauren does such a good job explaining the process, so I will just give you the link. Click here! […]
[…] made the crust using this recipe from Lauren’s Latest, and we cooked it at 500 degrees for about 9 minutes on a pizza stone […]
[…] these Fail-Proof Cheesy Garlic Bread Sticks if you’re as addicted to pizza as the rest of us. You’ll never want take out pizza again. […]
[…] am making these bread sticks next week. And these potatoes look a bit too delicious to pass […]
[…] 1/2 lb pizza dough (I used Lauren’s recipe) […]
This is really good I love it thanks for sharing!!!!
I LOVE! this recipe I have already made it a total of 10 times, I made minor adjustments and added it to my book of all time recipes! PERFECT
[…] dough, homemade or store […]
Can I use mozzarella instead of Parmesan?
of course!
Thank you for your Pizza Dough recipe and Cheesy Bread Sticks recipes. Thank you especially for explaining why you use the ingredients that you use; it gives a better understanding. Appreciate everything, thanks!
Fun, easy and delicious. I also made a Piña Colada cake.
I was wondering if I could make it in advance and freeze it? Would the outcome be the same?
I froze my dough and it came out great when I was ready to use it. I just made a double batch that I will freeze for later.
I made your dough before I got a stand mixer , delish! Tried in the stand miXer and it looks like flex of grey stuff from the bowl came off! Too high of speed maybe?? Threw it away!
[…] I hit cup 7 of flour and then take the dough out and add the last two by hand on my counter top.Pizza DoughLove love love this recipe! I am so glad I was pointed towards it by a friend on Pinterest. […]
Hi Lauren. This pizza dough recipe is amazing! I’ve used it so many times already. I actually read the manual for the KitchenAid mixer and it says that you MUST use your dough hook on speed 2. Otherwise, it may damage your mixer or dough hook. For your recipe, I still kneaded it for 6 minutes on speed 2 and it always comes out perfect. 6 is definitely a magical number.
Olá!!!
Desejo receber novidades e receitas através de meu e-mail.
This is awesome! I used a bread machine for dough setting and it came out awesome. I have used another recipe for pizza dough and my entire family agrees that this beats it by a mile! Thanks so much.
It was wonderful! Great job coming up with it, we will make it again and again!
[…] I’m still coughing up a storm and feeling lousy, so I’m going to make this quick. A few months ago, I made a mexican-style pizza, put doritos on it and threw it onto the interwebs. […]
I pinned this recipe a few months ago and just made it tonight. I’m kicking myself for not doing it sooner. It turned out delicious! I had never made pizza dough before so I followed your directions to a “t” and the breadsticks and pizza I made turned out flawless. Great recipe, I will never buy frozen pizza again.
Just made this and it is absolutely fantastic! This is definitely a keeper because it is easy to make and the taste is out of this world! Thank you all the way from the Netherlands!
[…] of your favorite pizza dough (here is mine) grated cheese, cheddar or mozzarella mini pepperonis Italian seasoning garlic salt […]
I absolutely love this dough recipe, I use it ALL the time! I even made it with nearly dead yeast the other day, and it still turned out fine – it really is fail-proof!
Has anyone ever tried par-baking this crust, to then be frozen and cooked later? I’d like to give the dough as a gift, but don’t want that person to have to go through the trouble of shaping the dough. I know the dough itself freezes well, but I’d like to know how it turns out if par-baked before being frozen.
WOW! just made these for the first time whilst snowed in….all by hand as well yummy!
Just made these whilst snowed in…all by hand as well, GORGEOUS!
What’s the difference between using and upside down cookie sheet and a pizza pan? I feel like they’re the same.
As long as you preheat it in the hot oven then transfer your pizza over, both would work the same.
Thank you for sharing this! I made this today (using a different pizza dough). I also sprinkled on some oregano, basil and parsley. It was a hit!!!! My kids love pizza but many times I don’t have sauce so this is a great alternative. And it tasted just like the breadsticks you get in restaurants too! Thank you!!!!!
Hi! I am letting the dough rise right now! 😀 I was just wondering if I am supposed to preheat the cookie sheet like I would the stone.. And would I just put a little olive oil on the cookie sheet to keep the pizza from sticking? Thank you so much!!!
[…] take a rocket scientist to throw together. 30 minutes tops? I ended up baking a batch of my fail-proof pizza dough in the shape of hoagies making this whole process a little longer {annoying my starving husband and […]
How long will the dough last ? Can I make it on say a Sunday to cook and serve for Monday or should I use it the same day I make it ?
You can store this in the fridge for a few days, as long as its wrapped up so it doesn’t get dried out!
All I have to say to you for this post is THANK YOU!!!!!!!!!!!!!!!!!!!!!!!!!!!!
We have pizza at least once a week. Homemade of sorts but now will be absolutely homemade and with Cheesy bread to go along with it. Kids are all excited and want it NOW.
[…] P I Z Z A D O U G H recipe (adapted from here) […]
I pinned this a couple weeks ago and finally got to make it tonight. Perfection! I have a large family and love leftovers so I always double the dough recipes. The garlic cheese sticks are the new favorite and the dough was exactly the flavor and texture I’ve been looking for! Who knew Bread Flour! THANKS!
This sounds amazing, must try and share with friends and family. Tks 🙂
Hey, do you melt the butter or do you leave the butter as it is?
I usually melt the butter…but that’s because I can’t defrost butter in the microwave like AT ALL.
I can’t wait to make this!!! Do you think it would work instead of rolling it up folding it over like a calzone? Just as something different, I always like to try new things 🙂
It’s a good all purpose dough–really great for calzones!!
Seriously?!? These were unreal! I’m a pretty good cook and my husband RAVED about these and said they were the best thing I ever made. Your directions were spot on. Only thing I did different a was to knead at a lower speed for 10 minutes because my mixer almost walked off my counter on high. Thank you so much for sharing this recipe!
Made this today with whole wheat flour. I think I spread my crust too thin as it was kind of like having cheesey bread on a large tortilla. Either way it was still delish 🙂 used the other half of dough to make a calzone. Thanks for posting!
Found this recipe via Pinterest (aka the best thing ever invented) and made a double batch tonight with the family. Totally delicious and it really was easy to make. We made 2 pizzas, 1 cheesy garlic bread and froze one portion of dough. Thanks for sharing and great pics, too!
I have been searching for an awesome pizza dough for YEARS! My family loves pizza but nobody liked it at home because the crust seemed off. Tonight – it was gobbled up! Thank you so much!
Lauren, I am on a mission to make the best pizza ever, to stop my teenage son pestering me to buy takeaway pizza, as he claims it’s far superior to the supermarket bought types, and I have to agree with him! I have already earmarked what seems to be the best tomato sauce ever (http://www.food.com/recipe/ultimate-pizza-sauce-114392)
and now it looks like I’ve discovered the best pizza dough recipe right here!! It looks fantastic!
So as soon as I’ve made what could be the ‘best pizza in the world, ever’ I will let you know how it turned out! (My teenage son’s verdict!)
Many thanks for posting!
I don’t have a mixer….will the dough still come out alright?
Yup! Just knead it by hand.
[…] Disclaimer: This isn’t my original recipe. I found it on Lauren’s Latest. […]
Does this recipe make enough dough for only one pizza or one recipe of cheesy bread sticks?
One recipe will make 2-12 inch cheesy breadsticks, or 2-12 inch pizzas.
By far the best dough recipe I’ve tried! It came out perfect! Thanks for sharing.
I have never made a pizza dough before, but I plan on making your recipe tomorrow and serving up some amazing cheezy Breadsticks! Thank you!
OMG!!! This looks SO good!!! I got your recipe off of Pinterest, and i’m making these for Super Bowl sunday tomorrow!!! Thanks so much Lauren! ;*
Also, a question:
Would it be alright if I freezed the dough, or do I make it fresh???
Another Q:
Should I freeze it or refrigerate it??? Thanks again! ;*
I’ve made this multiple times with great success until this most recent time. Has it always called for 2 teaspoons of salt? It dough and finished crust tasted incredibly salty with that amount (and I like salt). I think it killed my little yeasts too.
Am I crazy and it’s always been that?
I haven’t changed the recipe at all! Maybe you over measured? That’s really weird that all of a sudden it stopped working. Did your yeast expire? That is so strange!!
I stumbled on your pizza dough recipe recently and I tried it out tonight. I make pizza once a week and generally use store bought bread dough for the crust because every pizza dough recipe I have tried, I didn’t really care for. But I’ve been trying some new ones again lately so I wanted to try yours.
Well, I made it, and kneaded it by hand and it produced a beautiful crust. Love, love, love it! Thanks so much for sharing!
I’m getting ready to make this for the second time…First time was perfect…This is my go to crust recipe from now on..No need to mess with perfection!!!!! Thanks so much for posting!!!
What is bread flour? Can’t wait to try out the dough recipe!
It’s flour that has more gluten in it.
This so easy and so yummy! Thanks for sharing your recipe!
thanks sooooo much for this recipe!!
I’ve made this crust twice! It is the best recipe ever! Made garlic bread, thin crust pizzas, cinnastix, and used two crusts worth of dough and made deep dish pizza in the iron skillet. All of them were fabulous! I do have a pizza stone, but if you don’t, an iron skillet is a great way to bake the crust (thick or thin).
I doubled the recipe both times I made it. Once I separated the dough into individual crust amounts, I wrapped one in the plastic wrap (press n seal for me) that was on top of the bowl and put it in the freezer. A couple days later, i pulled it out and put it in the refrigerator in the morning. Hubby sat it on the counter to warm up a couple hours before dinner. It was just as good as before it was frozen!
Thanks for this. BEST EVER! My sister has sworn by this recipe for a year. I made it, loved it and wrote about it. I linked back to you.
http://abirdandabean.com/the-best-pizza-dough-ever-and-a-snowman-pizza-pie/
Thanks!
[…] fabulous recipe that she has been using for the last year or so. And it come from another blog. Lauren’s Latest. Well, thank you Lauren! Nice work. Head on over to Lauren’s blog for a very good and […]
This was the BEST garlic pizza bread EVER! I have never worked with yeast before, usually I just buy the Rhodes frozen bread dough, but never again! Made one pizza and one pizza bread. I wish I would have doubled the recipe! My kids ate it so fast that my husband and I only got one stick! Thank you for the easy to follow recipe and steps. It really was super easy, I don’t know why I was always afraid of using yeast. This is a keeper for sure! THANK YOU!
I made this pizza dough tonight and it turned out great. I made it with whole wheat flour but added a couple tsp of vital wheat gluten and it was really good. Rolled out perfectly. This is my new go to recipe. Thanks tor sharing.
Made this recipe today, I had the seal of approval by the toughest critic… My Grandma!! She loved it!! I’ve been buying the dough, but now I can make it!! Thank you!!
This looks great! Hubby likes home made pizza but not cheesy garlic bread. I would think you could add a tablespoon or so of sugar to make as a sweet dough. He likes Carmel rolls so this should would great. I’ll let you know.
Hi !
I got to leave a message to say that dough is PERFECT !!!
The ratio 1 cup water / 3 cup wheat was exact to me, and i am pretty excited because i ALWAYS failed on rising my bread/pizza dough (we use grams and liters in France, which make it very difficult if you don’t have a balance, like me…)
Hubs asks me for pizza every night till then 😉
Thanks again !
[…] my hand at homemade pizza. I found a good dough recipe via one of my favorite blogs, who shared this link to her favorite, most perfect pizza dough. Yum. I had to […]
Does this make 1 round pizza or 2? making it now and can’t wait to try it!
1 super large or 2 medium.
I LOVE this dough recipe!!! I’ve made it about 4 times now and it’s definitely become my go-to pizza dough recipe. I’ve never had a problem when I follow the directions and it’s SUPER simple. Thank you so much for sharing this!!
[…] like a portable pizza. Start with my Failproof Pizza Dough, then fill it with whatever toppings you’d like! Turns out perfectly every time and always a […]
Validated! I’ve never made any sort of bread dough without using a bread machine, so I was nervous. Despite my lack of skill and experience, this turned out beautifully, with rave reviews all around. So glad I have this recipe!
Can you still make this if you don’t have a stand mixer? I want to try it but a stand mixer isn’t exactly something I can just go and buy on impulse right now.
[…] Pizza dough, bread, cookies and cinnamon rolls all happen in my mixer. Why? Because it’s faster and easier than doing it by hand. And because my husband washes all the dishes I dirty…most of the time. {How did I become so lucky?} […]
[…] out by spreading your pizza dough out into a rectangle on a baking sheet. I used my Fail-Proof Pizza Dough Recipe because it is in fact fail proof. And I also used parchment paper because I didn’t want to […]
[…] out with some pizza dough. I used my Fail Proof recipe and mixed it with half bread flour, half white whole […]
[…] my hand at homemade pizza. I found a good dough recipe via one of my favorite blogs, who shared this link to her favorite, most perfect pizza dough. Yum. I had to […]
I didn’t get the “upside down cookie sheet” part.
How does that work?
Thanks!
I found your recipe on Pinterest, and I love it! We have Friday night pizza almost every week and I am always in search of a good recipe…I tend to get tired of them after awhile. Thanks so much! It’s delish!
Lauren,
Congrats for your site =) You look so much like Lauren Faust. Anybody ever told you that?
Dough is rising… another 30 mins and it will be prepped for the oven 🙂
followed the recipe, cranked oven all the way up. smoked out the apartment. burned the pizza after 8 or nine minutes. the cheese bread is not burnt but it came close. where did i go wrong?
(turn the mixer on high to knead for 6 minutes) What kind of mixer? I dont normally cook bread. I do love your site.
I use a KitchenAid stand mixer with the dough hook attachment.
[…] from here. It’s the second time i’ve made this. Last time i followed the original recipe […]
[…] Make Your Own Pizza Bar Fresh Fruit Fresh Veggies Spinach Salads Tons of Bite size Desserts & Snacks Pink Lemonade, Spa Water and Sparkling Grape Juice […]
[…] of Insane Greatness Bacon, Eggs and Fruit Homemade Pizza Fresh Fruits and […]
Just want to say that I’ve made this several times and it’s wonderful! We all (my family and friends) look forward to having these cheese sticks and pizza with this dough recipe.The only addition I make is to brush the edges of the crust with olive oil and sprinkle with a little kosher salt and pepper. Marvelous! Thank you so much for posting it 🙂
I am your typical guy who has never cooked anything in his life… I decided I wanted some cheese sticks but was tired of the usual papa johns and all the grease and preservatives. So I found this site and Oh My God!!! This was amazing… It not only turned out great but tasted so much better than papa johns… I even found a recipe to make my own ranch dressing to dip them in. I couldn’t believe how easy it was to make. Thank you so much for showing me that cooking doesn’t have to be difficult…
I’m going to try this tonight can’t wait! can you refridgerate what you don’t use? how long should that stay good if refrigerated? thanks!!:)
I just thought I would say thanks. I have been craving a decent pizza for a long time. Where I live decent pizza is hard to come by, and ingredients are hard to find as well. I did all this, and I am not a cook, for the first time today, and it turned out wonderfully.
I use this recipe as well. I love how the crust comes out. We also love cheesy garlic bread; after I am done cooking them I usually sprinkle a little bit of parsley over the top to make them look just like the pizza place!
This pizza crust recipe is awesome!! I ve tried both the cheesy garlic bread stix and as pizza crust. Have you ever tried freezing the dough to have on hand for a quick pizza at a later time? If so, what steps do I follow?
[…] Basic Pizza Doughyield: 2-12 inch pizzas, approximately 1 lb. of dough Print This Recipe […]
I have this recipe pinned on Pinterest, and I have made it 3 times now. My children like it a lot! Last time I made it I did your crust with cheese pizza, your garlic cheese breadsticks, and also cinnamon sugar bread sticks. My daughter just requested we have it again tonight… II just made them 5 days ago! 🙂
Thank you so much for your efforts, and for sharing!! It is so good!!
TtHis is the BEST pizza dough recipe I’ve used. I’ve tried so many I was nervous to try try this one……. Long story short I made it and love it. I ended up making another batch and made cheesy bread for my mom. Side note I didn’t have bread flour so I used all purpose and it turned out good. I can’t wait to try the recipe with bread flour.
Thank you, Thank you Lauren. Oh, my kids said THANK YOU!!!!! I guess they got tired of the experimenting!!!
I found this amazing recipe on pinterest & I absolutely LOVE it! Simply amazing! Thank you so much! My family thanks you too haha 🙂
Do you have a recipe for a good marinara? I live overseas and it’s hard to find tasty pizza sauce/marinara. This recipe looks incredible and I can’t wait to try it! thanks for sharing!
Not on my blog, but I can post one!
Thank you soooo much for this!
As everyone else said, the pictures really got my mouth watering to try this out. So I did as soon as I could and it was the best pizza I’ve ever had! The only recommendation I would make is to let it rise twice. Make sure to make it at least a day before you eat it. After the first rise, punch it down and store it wrapped in the fridge overnight. Pull it out 1 hour before baking and the flavor is AMAZING. (or split the dough in half and have it 2 days in a row, see if you notice a difference)
Your wonderful recipe really gets the texture right and allows the flavor to build. I’ve made my share of cardboard pizzas, but thanks to you that era is over.
And CHEESESTICKS! Brilliant!
[…] Homemade Pizza Homemade Garlic Breadsticks Fresh Fruit & Veggies […]
[…] Pin is here: Fail Proof Pizza Dough […]
Made two batches so that my 4 kids could have their cheese pizza, and my hush and and I had ours 🙂 he can’t stand my cooking (I try lol I really do) but tonight he couldn’t stop raving on how good this pizza was! Thank you so much for posting to pinterest. I’m so glad I found it and will be trying more of you’re recipies 🙂
Wow, I spent months and many attempts at making pizza at home only to come up with almost exactly the same recipe. Now my household (and a few friends and family) only wants my pizza. None other will do. And I agree, the magic is in the crust.
A couple of notes I would add are, I ONLY use King Arthur Bread Flour. It has a very high gluten content, around 12% I think. It makes for a very nice crunchy bottom crust with a wonderfully soft center. And, I also use instant yeast instead of instant dry yeast. The only real difference I believe is the shelf life and you don’t have to bloom it before mixing.
[…] I had homemade pizza crusts and pizza sauce in the freezer. I took these out in the morning before work so when I got home […]
Thank you thank you thank you!!! I made pesto pizza last night with zucchini and tomatoes… this dough is the best I’ve ever made! 🙂
I LOVE THIS! I made the cheesy bread and my husband hasn’t stopped asking me to make it again… this dough is really easy to make, even for someone with minimal experience in the bread area 🙂 thanks for sharing!
Thanks for this, my wife has been trying to talk me out of making my own stromboli dough, but i think im ready now!!!
Rising as we speak! Thank you Pinterest and THANK you for an easy recipe! 🙂
Found this on Pinterest after my sister raved about it — amazing and so easy! I was looking for a good recipe to make pizza rolls and most of the other ones out there were doomed to fail. Thanks so much for this one!
Just ate these hot from the oven – sooo good! I wanted to offset the torture of zucchini lasagna for my son. Unfortunately for him, he ate all his breadsticks first and had to sit and mope for 30 minutes until he caved in and ate the horrible dreaded zucchini (if he only knew it goes in all my chocolate baked goods hahaha!). I did not change a thing with the recipe. My hubby said it may be the best thing I have ever made so a big Thanks for sharing!
[…] smoking hot, too. Don’t have a pizza stone? Use an upside down cookie sheet. (suggested in the original recipe I linked to […]
Wow that looks incredible I will definitively try this recipe today!!! Thanks for this awesome recipe!!!!!
I made this tonight. I let the breadmachine to all of the work. This was so good. The kids went nuts over it. Nice crispy crust and so garlic-y! Thank you!
Made this tonight. The family absolutely loved it! I am also in love with the ease of the dough. My Kitchenaid made this a cinch and I was able to whip up the Cinnamon Biscuit recipe while it mixed. R u kidding? LAUREN..you are my new recipe BFF. Love the site, love the recipes!
[…] like the cheesy bread sticks that you get at the pizza place. The recipe is from a blog called Lauren’s Latest. (Thanks to my husband Bob for helping me figure out how to put up a link to all these blogs that […]
OK I FINALLY GOT IT!!!! ALITTLE SLOW ON THE CONNECTION I HAVE (LANDLINE STILL!!!) THANKS SOO MUCH LAUREN FOR THE GREAT RECIPES!!! diane
Hey, I am not sure you got my ? But I don’t have a Pizza stone or a mixer to knead the dough. Can I still make the PIZZA & BREADSTICKS?THANK-YOU1 IAM NEW T YOUR SITE AND I LOVE IT. My e-mail is [email protected]
Hey a BIG THANK-YOU FOR THE DELICIOUS RECIPES!!! ? I do not have a pizza stone, and nor a mixer to knead the pizza dough, can I still make this dough and have it turn out?
Yes! Knead by hand and use an upside down baking sheet.
[…] being knocked up, geez. Anyway, the other night I had a craving for pizza and I had half of this recipe sitting in my fridge. But, we just had this awesome Mexican Breakfast Pizza so I didn’t want […]
This recipe rocks! I’ve never done any type of yeast-risen bread or dough, so I was a wee bit nervous. It turned out DELICIOUS! Not too chewy, not to doughy- Perfect!
Thanks! I think now I might branch into other risen-type breads.
Have you ever made a batch of the dough, rolled them out and then froze them for later use? I would like to be able to just pull out of the freezer and use for a quick meal, just wondering if you’ve ever tried it?
nope, never tried it! Sorry!
WOW! I just used this for our pizza night, and it is awesome! Thank you!!!
I’ve been trying to eat less processed foods so I have been trying to give up white flour and start using whole wheat flour. Any suggestions for using whole wheat instead of the bread flour?
I would split the flour in this recipe half and half–half whole wheat, half bread or all purpose. If you’re not using bread flour, knead an extra minute. Bread flour seems to be the key in getting a nice chewy pizza crust.
[…] Stromboli is a simple twist on your average pizza recipe and makes for a tasty dinner. I used the pizza dough recipe from lauren’s latest: […]
Hi Lauren,
I made your pizza dough last week and it was absolutely delicious. I have been wanting to make my own pizza for such a long time. The word “yeast” in the bread making journey was just plain intimidating to me that I would never try it. But, I made yours and I was so proud of myself. I have a question. I want to make this tomorrow for my grandson’s birthday. Can I make this the dough today and assemble everything tomorrow? Would you please tell me how to do this? I would appreciate it so much. Thanks, Ruth
Yup! You can totally make this ahead! Just knead the dough as usual, put it into a greased bowl, move it around so it gets a light coating of oil and cover the bowl with plastic wrap. Refrigerate until the next day and remove 3 hours prior to let it come to room temp and then rise. After it’s risen, it’s ready to go! Good luck! So glad you conquered the yeast!! 🙂
Great tips on the pizza dough. I learned my pizza techniques in milan and you are right on! Have you try Grilling your pizza? I put it on my Hot Hot grill with the pizza stone or your upside down cookie sheet. It was amazing too!
Uh, yeah! Grilled pizza is the bomb.
Can you/how long would it take to mix this by hand? My son and daughter love cheesy bread and I would like to make it for them but I dont have a mixer.
Same amount of time my stand mixer as by hand.
[…] everyone “decorated” with their favorite toppings. i also branched out a bit and made cheesy garlic bread which were out of this world fantastic and not hard at all – minus the plan-ahead of letting […]
I know this original post is old, but I came across this on pinterest.. I have to tell you… ahhhhmazing! I use this dough regularly! I’ve currently got a batch doubling for calzones! Yum!
So thank you! This dough rocks our socks off!
[…] Find the recipe for the best pizza dough ever her […]
Do you think I can use instant yeast instead of active dry yeast? and skip the activating it in water step? Looks yummy!
Never used that kind of yeast before…give it a whirl and let me know if it works!
trying to duplicate pizza from childhood that was airy and light and cooked on a baking sheet,used to watch saL cut pizza into rectangular pieces probably 6×9,choice of pepperoni or not,could smell for blocks away,used to cut school to get first slice at lunch time. I think the aroma came from oregano in tomato sauce.lots of stringy mozzarella. pizza was approx.2″ thick and looked like sourdough bread instead of pizza.building no longer there. your reciepe gives me some ideas need to learn how to make sourdough starter. needless to say spent time in summer school for skipping class for pizza you’ve been very helpful,thank you DAVE
Your recipe can also be used to make delicious stromboli’s!
[…] The recipe for the dough can be found here: https://laurenslatest.com/fail-proof-pizza-dough-and-cheesy-garlic-bread-sticks-just-like-in-rest… […]
Hi Lauren
Made this last night LUSH cant believe how tasty it was.
PS I live in Italy lol !!!
X
[…] 16. Pizza Crust you can use to make Garlic Sticks […]
[…] *recipe derived from LaurensLatest.com* […]
can i use my food processor or the bread machine to kneadthe dough? thanks
I’ve never tried either….give it a whirl and let us know!
[…] Easy Peasy Pizza Dough […]
Thank you SO much for such a great recipe! I didn’t use the crust recipe, as I have a great one of my own, but you have so many great tips and the cheesy garlic breadsticks were fabulous!! I even made the gluten-free and they were so yummy! (Here’s the link if anyone is interested in making them gluten-free: http://karissawagner.blogspot.com/2012/08/cheesy-garlic-bread-sticks.html)
Thanks again!
Hi! Anxious to make this on Friday. I have a question for you first though. Could you substitute whole wheat flour for the bread flour? Thanks in advance!!
I wouldn’t substitute all of the flour for whole wheat. Try 1/3 to 1/2 whole wheat.
The trick in the taste I found is you MUST use olive oil! It just doesn’t taste right unless you do!
I can’t wait to try these! I was just wondering about which shelf of the oven you put it on, my oven’s heat source is at the bottom, if I have it at 500, should I put the stone on the top, middle or bottom shelf?
Thank you so much
I’d say start in the middle. If it’s getting too crispy or dark too fast, then move it up!
[…] pizza dough adapted from lauren’s latest […]
cheesy garlic sticks
cheesy garlic bread sticks lauren
cheesy garlic bread from lauren2
instead of a pizza stone, because i dont own one, i use an upside down cast iron skillet. that way you get a high thermal density similar to a pizza dough.
love cast iron skillet idea. Was a little concerened about the thiness of a baking sheet.
Great idea!
Made this dough today for lunch. I topped our pizza with Ina Garten’s pesto recipe, mix of sliced cherry tomatoes, red onion, bacon, and goat cheese. Best pizza I’ve ever had. I’ve tried several pizza crust recipes and this one is my favorite. Thank you for the recipe! Take gentle care.
This made delicious garlic bread and pizza! Thanks for sharing!
Hi!
[…] of bread or cereal-based meal: rewana / paraoa parai, naan bread, chapati / roti, ciabatta, pizza, bread and butter pudding, pita bread, corn bread, challah, and a million other bread bread […]
I just made this and wanted to thank you for sharing such a simple “fail-proof” recipe. I too am a pizza-a-holic and eat it way more than I should so thanks again for that!! 🙂
What is even better is when you add the original Mrs. Dash…yummy!
do you have to use a stand up mixer? Or can I use my hand mixer
Just moved from Oregon to Alaska… My new Alaskan friends LOVE this! Me too. Thanks Lauren.
[…] Pizza Dough: Put four portions in the freezer to pull out for pizza, or for cheesy breadsticks to add to soup! Yum! […]
Made this using my bread maker on the dough setting and it worked great. We live out in bush Alaska and do not have the option of ordering out pizza. This was perfect for my families love of bread sticks from back home in Georgia
This may be a silly question – but do you put the pizza on the pizza stone with the parchment paper underneath and bake it that way?
[…] on Sunday night, based on a pizza from a nearby restaurant (A Tavola.) I got the pizza crust from this recipe. The dough was pretty easy and it turned out perfectly chewy and crispy. I didn’t get […]
I just made this pizza dough for dinner and it was fantastic. It was so simple to make and so so very tasty. I think this one will be a regular. I love that the mixer does everything but top and cook the pizza. Thanks for a great recipe!
Thanks for the cheesy breadsticks recipe!
For perfect (to my tastes) pizza dough I add one extra step- overnight in the fridge.
I use very close to the same recipe as yours(2 tsp yeast in mine), but instead of just letting it rise I cover and put it in the fridge overnight. 3 hours ahead I pull it out of the fridge, let it get to room temp, punch it down, then let it rise.
The extra time in the fridge gives it an almost sourdough taste without all the hassles and variability of using sourdough.
I haven’t tried it with cheesy breadsticks yet, but for pizza it is my favorite.
I think this looks so amazing!! I used to work in a pizza place back in high school and we used the original MRS. DASH to sprinkle on top of the cheese sticks when they came out. It was super good.
I followed these directions to a “T” but without the aid of a mixer and it turned out amazing!!! Thanks for posting this recipe!
Can I roll the dough out into the pizza shape and then freeze it for later use?
I made this last night and I love love love love love it! Perfect! Crunchy! Chewy! And it cannot be any easier to make!
I used this recipe to make a pizza for a potluck at work and it was a hit! Several people asked me about the crust!
Also, I added one tablespoon Italian seasoning to the dough while it was mixing! 🙂
Finally made this tonight. Made a couple of pizzas and some cheesy garlic bread, so yummy, thanks! 🙂
I made a stuffed crust pepperoni pizza tonight using this recipe and my husband & I love it! For a fledgling cook, it’s given me a huge confidence boost! This is a keeper. Thanks so much! 🙂
… so I’ve tried this twice now (06/2012). One thing I’ve found, my older KitchenAid mixer is different than the ones people are using now. Mine works with bigger batches, but with just 3 cups of flour, it did not work. I just did it by hand, which may be a bit more work, but probably equals out by not having to get out/put away the mixer. Both times I made this, it REALLY smoked up my oven. Not sure if it’s just because 500° is so hot, or if it’s because my parchment really only says up to 425°, or because some of my cheese and butter is dripping off and burning. I’m surprised our fire alarm didn’t go off! *Ü* It IS really yummy though and we’ll be making it often. I’ll need to try making the bigger batch and freezing some as others have seemed to indicate it worked fine (then I could use my mixer!). A “Pinned, Tried, Reviewed” recipe!
We have this in Canada, New Brunswick for sure and we call them garlic finger and we eat it with donair sauce. You can order a garlic finger where ever they sell pizza down here.Yumm I want some now hehe so trying your recipe 🙂
I tried the pizza dough and it worked so well. I simply put my homemade tomato sauce, then mushroom, basil and cheese. Nice and fresh from the oven 🙂 Thank you so much for sharing the recipe.
our recipe is great. this is the first pizza dough recipe that’s actually worked for me. i love it and it also taste great.
one problem – i can’t roll it out in the traditional round shape? how did you do it?
I don’t use a rolling pin, I just punch it into a circle and keep working it around into a circle. Takes a little practice, but do-able! 🙂
Every time I make this crust and this cheese bread, I’m astonished by how truly perfect it is! WOW! According to my 8-year-old, it’s better than the local pizza joint’s cheese bread AND pizza. THANK YOU for sharing this recipe…it’s perfect!
OMG! Just used this recipe for a pizza for supper…… so many amazing tips! I love this site!!!. Made the crust and spread with sauce. Sprinkled with Italian seasoning, added pepperoni and my fav toppings: diced onion, multi-colored peppers, and mushrooms . Topped with cheeses – Parm, Havarti and Mozzerella. Baked on the preheated stone for +/- 10 minutes. Let set for 10 min. before slicing. To die for!!! Thanks 🙂
omg that dough looks amazing. i’ve been trying to create/find the perfect pizza dough(for my tastes) and this looks like it could be the winner! i’ll update what I think of it when I finally try it!
If I have extra dough, would it work to freeze an extra pizza to make later in the week? have you tried it?
What was the little trick to do if you don’t have a pizza stone?
Preheat the oven with an upside down baking sheet in it. Place your pizza on that and it should help get the bottom of the crust pretty crispy!
[…] quick one today guys! I’ve finally found my favourite pizza dough recipe thanks to Lauren at Lauren’s Latest. Out of all the recipes I’ve tried, this one had the best taste and the right doughy texture […]
Thank you! Finally a pizza dough that I can work with. The cheese bread is delicious.
From one pizza addict to another that was amazing! A keeper forever in this family thanks!
Do you always bake the pizza at 500 degrees? the recipe look delicious.
thanks
Yup! Always!
[…] the shower. I had made pizza dough earlier in the day so I rolled that out and baked up some of the most delicious homemade pizzas ever. Seriously, they were better than the Papa John’s pizza we’d had earlier in the […]
Found your pizza dough recipe on. It was the best pizza I’ve ever made! Thank you so much for sharing your ideas. I wasn’t letting the dough knead long enough and preheating the stone made all the difference:)
Thanks again,
Tori
Oh yum … now if I could just find the *perfect* recipe for donair sauce, I’d be set!
[…] https://laurenslatest.com/fail-proof-pizza-dough-and-cheesy-garlic-bread-sticks-just-like-in-rest… Like this:LikeBe the first to like this post. […]
[…] https://laurenslatest.com/fail-proof-pizza-dough-and-cheesy-garlic-bread-sticks-just-like-in-rest… Like this:LikeBe the first to like this post. […]
This was excellent. My family loved it. Thanks for this recipe.
Great recipe
[…] made the crust using this handy recipe handed down to me by a sweet […]
Oh my! Definitely making this ! Maybe even today! Wow
[…] I fired up a quadruple batch of “Fail-Proof Pizza Dough” from Lauren’s Latest and went to town. I made up some cheesy garlic breadsticks, some […]
How would it be best to store the leftover dough if I just make a pizza from half of it at a time? Freezer?
WoW! This looks like something even I could do! Definitely in the plans for this weekend.
My one question: Have you ever tried freezing this? If so, at what stage did you freeze it?
Thanks so much! 😀
After you knead the dough, you can store it in ziploc freezer bags and freeze it for weeks. Then when you’re ready to defrost, remove frozen dough from bag and place into lightly greased bowl. Rise 2-3 hours or until it has doubled in size and use as desired.
I have used this recipe for awhile – and it’s amazing!! – but I recently got a bread machine and was wondering if you have any tips for adapting it to a bread machine recipe.
Thanks!
Just wanted to let you know that I’ve used this recipe several times now, and I always get compliments! Thanks!
Lauren,
This recipe you use is exactly the recipe that I have used over the last 10 years. It has never failed me. Mine is called “Honey Baked Pizza Crust”. The only different ingredient of mine is 2 tsp. of dry italian dressing mix that I add with the salt. It is glorius. Try it and I guarantee you will love it! Sara
Has anyone used this dough recipe in a breadmaker. Trying to idiot proof it a little more 🙂
I am trying this recipe right now! I will let you know how it turns out!
please give directions when you don’t have a stand mixer.
Everything is the same–just knead by hand an extra minute.
Hi Lauren! We tried your dough recipe, garlic cheesy bread recipe, and made homemade pizzas with your dough. They turned out amazing. I just blogged about the attempt and posted links back to your site with many praises for you! Thanks so much for posting this, it’s going to be a long time family favorite from here on out.
http://clevercraftycookinmama.blogspot.com/2012/04/homemade-pizza-and-cheesy-bread.html
I made this crust tonight and added the toppings to California Pizza Kitchen’s Thai Chicken pizza and it was to DIE FOR! Thank you for the recipe 😉
[…] *recipe derived from LaurensLatest.com* […]
My favorite toppings that I have been putting on my pizza (using this dough recipe of course!) have been caramelized onions, mushrooms, and sliced brussel sprouts. I saute them all together in a pan until they are all slightly golden. The brussel sprouts are mellow and delicious this way. Kids would never know they were eating their greens!
here’s a recippe to go with a great dough. (use only fresh basil)
1- spread pizza dough.
2-chop 2 cloves of garlic sprinkle with salt and with the side of your knife work into a paste. 3- place in a small bowl with 1/4 cup olive oil.
4-spread mixture over dough
5-spread your usual pizza cheese blend
6- coarsley chop 6-8 fresh basil leaves and spread on your pizza,and bake at slightly lower temp. than regular pizza until it starts to turn golden.
I made this pizza dough last night and I have to say that it was amazing! Easy, fast, great texture, and tasted just like NY style takeout pizza crust. I didn’t even have a stone but I will be getting one now! Thanks for the great recipe.
[…] Fail-Proof Pizza Dough BBQ Chicken Pizza Bacon, Asparagus and Brussel Sprouts Pizza with Red Onions and Goat Cheese Pepperoni and Mushroom Pizza Cheesy Breadsticks Salad & Fresh Fruit […]
Do not heat your pizza stone to 500 degrees! It caused mine to break in half in the oven!! The dough tasted good, but I’m not happy about my Pampered Chef stone breaking!
[…] Basic Pizza Dough yield: 2-12 inch pizzas, approximately 1 lb. of dough Print This Recipe […]
I am waiting to put these in the oven now!! We are having the chsy sticks along side our lasagna! I can’t wait to try these!!!!!! It’s been a major pregnancy craving and that picture did me in 😉
hi,
I live in Alaska and was wondering if its a rainy but hot day do I need to add more flour or less??
Lauren, THANK YOU SO MUCH for this pizza crust recipe!!! I have been, literally, searching for YEARS to find the perfect crust and this is it!!! I can’t even begin to count the number of pizza’s I’ve subjected my family to during my quest. It’s a good thing they like toppings anyway!! This crust is ABSOLUTELY PERFECT!!!! It’s chewy and it’s tender and it’s EXACTLY what I’ve been searching for all this time!!! Bless your heart!! Thank you so much!!!
I made this dough last night. I didn’t have any problems at all! Thank you for such a wonderful recipe!
I did make pizza and breadsticks. However, the breadsticks weren’t as cheesy as I would have liked for them to be. I don’t know if I needed to add more cheese or what. Either way this is definitely a keeper. My husband loved it too!
[…] from Lauren’s Latest (great food […]
[…] https://laurenslatest.com/fail-proof-pizza-dough-and-cheesy-garlic-bread-sticks-just-like-in-rest… View more posts in: […]
I have been searching for a really great pizza dough…. THANK YOU! I had to reduce the salt in half, (and I use regular flour and knead it a little extra) but otherwise it has been GREAT! I hope you don’t mind that I linked to your page from my new blog simplelivingbasics.blogspot.com on my post about pizza. Thanks for the great recipes!!
Glad you liked the recipe Sarah!
Can I use my bread machine and still get a good result?
I’ve never used a bread machine for this, but give it a whirl! I don’t see why it wouldn’t work.
Too much salt in the dough, but otherwise it worked out well!
Thank you so much for sharing this recipe I just made a batch of cheesy bread and a pizza. Amazing and will be a staple for my pizza loving boys!
[…] made lasagna soup from the blog A Farm Girls Dabbles and cheesey garlic bread from Lauren’s Latest […]
Finally…FINALLY! A good pizza crust! THANK YOU!
Oh my holy yummy. The pizza and cheese bread was AMAZING better than any of the local pizza joints around here. Perfect crust was spot on and was surprisingly easy. I dont have a stand mixer so I did the kneading by hand for 6 min. exactly and it turned out beautifully!!!!!
I’ve been making a bread recipe very similar to this for years and have been wanting to decrease the sugar when I use it for pizza dough. This was perfect and I love the olive oil substitution. One comment on the flour…I noticed a lot of people have said they added a lot more flour and a lot of people saying the dough wouldn’t stay stretched out very well. I learned in a bread class that when you add too much flour it will become too elastic and retract when you roll it out. When I took that bread class, I was amazed at how much more sticky the dough should actually be than I was taught. When I made this recipe it looked quite sticky, but I resisted the urge to add more and it turned out perfectly. I also learned to roll it out with Pam, rather than adding more flour…to help it from drying out. Just some suggestions:)
Can you make ahead of time and freeze. Then thaw and bake what temp. Thanks
Lauren, ok I am finally getting on board with this blogging world. I just wanted to let you know that I am totally trying this….for sure! But more so, I really like your style. Fun to read and easy to follow. Keep it up!
Oh. My! YUM
Would this freeze well? Would I freeze after it rises?
We made this tonight. It is soooooo good! Thanks for sharing!!
do the measurements change in high altitude places?
[…] Chicken Garlic + Pineapple Pizza using dough via Lauren’s Latest […]
I just made (this) dough for the first time ever and it came out great. I added too much flour the 2nd time and added a little bit of water to dry it out. I don’t have a stand mixer and kneaded it for 6 minutes and it still came out perfect! Thanks a lot for the motivation! 🙂 don’t need to order papa johns cheesy breadsticks anymore!
Loving this recipe! Wondering if I can make the dough a day in advance, keep in the fridge overnight and bake the next day? THANKS!
-Alex
You sure can!!
Hands down the best pizza dough I’ve made. It has a wonderful flavor and is so easy to make. I used it to make your Stromboli, which came out perfect. Thanks for the recipes!
This is my new pizza dough recipe. We love it! Wondering if you’ve tried freezing it?
I have frozen this pizza dough before–when you defrost it, make sure to add a little oil to the bowl so it doesn’t stick. It might be a little bit stickier once it’s all defrosted, so knead it with a little flour and it should be fine.
Could you make the dough, and then freeze it and use it later?
Just made this tonight. Following your directions EXACTLY. I have been making pizza dough for years and my recipe was virtually identical, but always came out kind of floppy and sad. Never with a crisp bottom and chewy inside. This recipe worked beautifully! It turned out fantastic and I want to THANK you!!! I do have a few questions. Can this recipe be doubled? Or am I better off to make it twice if I want to get 4 pizzas? Also, what if it rises a little more than 2 hours or a little less than 1 hour. Is the dough forgiving? Will that impact the results? And finally, my dough was so springy that it was hard to stretch/roll out. It kept wanting to snap back. Any tips? Oh, and one more thing :-)…. the dough/cheese bread got a ton of air bubbles in it. Is that typical? Do I need to poke it with a fork a few times before cooking? Thanks!
I LOVED your bread sticks recipe! Though mine did NOT end up looking like yours..it did taste just like the cheesy bread sticks I love from our local Godfather’s pizza. Yum!!! Thank you so much for sharing this!
Love it! Love it! I made this tonight and was shock how great it was! Taste like the real deal and my hubby n friends could not believe i made it. Thanks for sharing!
Just wanted to thank you so much for this great pizza crust! I’ve made it twice this last week and it’s turned out great! Mine always used to be mediocre and I was a little discouraged. 🙂 I came up with a pretty delicious Three Cheese Ham Calizone recipe to use it with if you’re interested: http://kammyskorner.blogspot.com/2012/02/kammys-three-cheese-ham-calzone.html
and I linked back to you! 🙂 Thanks again!!!
I don’t think I ever told you that we make this recipe like almost every week. We have pizza and movie night every Friday. We’ve made cheese garlic bread as well. Yum! Funny thing is I have to hold on to my Kitchen Aid for dear life every time I do the 6 minute mix, other wise it will ended up “jumping” off my counter. Haha! I don’t know if it’s because it’s old and the bottom doesn’t hold on as well. Anyway, it is totally fail proof!!
[…] on your pizza crust. I used this recipe for the crust, but used whole wheat […]
I would love to make this, but I do not have a mixer like yours. Can I still make this with a hand mixer?
Only try to make this with your hand mixer if you have the special dough attachment!! Otherwise, just make it by hand!
Can you make this earlier in the day and store it in the fridge, 100% done and ready to put in the oven? Also, I’m going to try cooking it on my Pizza Pizzazz this weekend! It makes re-heated pizza as good as the first time around!
I found this recipe via Pinterest and made it for a “make your own” pizza party for my family! It was so delicious and such a hit! I have a couple of questions… Can you freeze this dough? Also, can I make it ahead of time and leave it in the frig until I’m ready to use it? Thanks for sharing your wonderful recipe!
I’m going to try your pizza dough for your amazing stromboli recipe! Quick question: is active dry yeast the same as fast rise yeast?
No, there is a difference. I’d use the fast acting if you have it–the dough will rise much faster!!
[…] votre maximum! Pensez à des amuse-gueules consistants comme de la Loaded Baked Potato Dip, Pizza Dough and Cheesy Garlic Breadsticks, Sriracha Honey Buffalo wings, ou Asian Turkey Meatballs puis complétez le tout avec des […]
Any tips on how to get from parchment paper to stone without messing your pretty pizza up when you go to put it in oven?
This is a great dough, and I make a lot of pizza! I use your recipe and an Alex Guarnaschelli recipe for delish sausage pizza. Crumbled hot italian sausage, caramelized onions, mozz, parm and when it comes out, a ton of basil (we like ‘no sauce’ pizzas). So good. Thanks!
Oh YUM! Love Alex Guarnaschelli!!
Totally dumb question, but do you put it in the oven to rise?
No, leave it on the counter!
Yes, I turn the oven to the lowest setting and let the oven warm up. After mixing the dough I turn off the oven, open the oven door, pull the rack out a bit. When the rack has cooled I put the bowl on the extended rack and cover the bowl to let the dough rise as the oven cools behind it. This works really well for me. I have twice made this recipe which turns out extremely delicious!
I just made this recipe. Wow was it good. I did breadsticks and definately will use this dough recipe for pizza crust. So many posts hadn’t actually made the recipe so I wanted to add a post that compliments how incredible this actually is. I don’t use garlic cloves so we used garlic powder. To be safe I baked at 450 and the dough turned out crunchy and still soft. I used bread flour and kneaded about 10 minutes by hand. I pressed the full recipe of dough the full size of the pizza pan which was thinner breadsticks but still very very restaurant-like tasting good. I warmed a small amount of pizza sauce/marinara sauce mixed for my son to use as a dip. This dough recipe is going to be a weekly menu item. A real keeper!
[…] I have pizza dough rising right now, from this delicious looking recipe. I’ll let you know how they turn out […]
Cheesy garlic bread
Have you tried freezing half of it for later? What is a good defrosting method?
I have a recipe to add to your pizza dough masterpiece. Sauce!
Here’s my favorite sauce recipe. It makes a lot so you can freeze it in 2 cup increments. 2 c sauce = 1 pizza. It takes two hours to simmer so I make it just start it before I start dinner. By the time I make dinner, serve it and clean it up, (I’ve been stirring it occassionally while in the kitchen) it’s time to take it off the heat and let it cool down a bit while I get the kids in bed. Then I put it into ziplocs for flat freezing.
Pizza Sauce
-saute 4 tsp. garlic and 4 tbsp olive oil for 2 min in pan. add:
4 28 oz cans diced tomatoes (112 oz total)
1 c. red wine vinegar
1 tbsp oregano
1 tsp. sugar
1 tsp. salt
¼ tsp. red pepper flakes
-simmer for two hours, stirring occasionally. Mash tomatoes with potato masher. Freeze in quart-size bags for pizza.
[…] laurenslatest.com via Sophie on […]
[…] out Lauren’s Latest to the recipe for these Cheesy Garlic Bread Sticks. Yummy! These would go perfectly with a weekly pizza […]
Hi,
I made these today for our family SuperBowl party-yum! My youngest child could NOT stop eating them!
I’m linking to this page on my blog. Thanks!
Hi-
This looks great and super easy! I’m wondering if I can freeze it? About to have baby two and looking for some easy frozen meals! 🙂
Yes, you can freeze it!
I have a question- Can you make this by hand if you don’t have a kitchen aid mixer? I want to make it for Super Bowl snacks for my family (I’m 13). And if you don’t have bread flour will it turn out okay? Thank you so much. 🙂
This recipe will work just fine if you knead it by hand with all purpose flour.
All your recipes are so easy and well worth the time to make from scratch! I’m looking for a thin pizza crust recipe to which I can add herbs – need less carbs but it still should be able to hold a few veggies and a little cheese. Any ideas? Thanks!
Google cauliflower pizza crust- it’s amazing!!
I have searched and searched for the perfect dough recipe!! I’m so excited to say this is the BEST pizza dough I have ever made!! Thank you!!
[…] We want you to bring your best game! Think of weighty appetizers like Loaded Baked Potato Dip, Pizza Dough and Cheesy Garlic Breadsticks, Sriracha Honey Buffalo wings, or Asian Turkey Meatballs then round out these hot and savoury […]
I was wondering if you can use a regular eletric hand held mixer to make this?
[…] From Lauren’s Latest […]
[…] homemade pizza for dinner (I use the Fail-Proof Pizza Dough recipe for my […]
I don’t have a large kitchen-Aid Mixer, so do you think that this would be a big undertaking by-hand? It looks so yummy! Thank you for posting! And how do you keep so small if you eat this once a week?
I’d say knead this by hand for an extra minute. It’s really not too bad! I’ve done it by hand before! And, I go to the gym…a lot!
[…] — Homemade using Basic Pizza Dough […]
So when u put th dough in the oven at 500 degrees do u go ahead and put the toppings on it first or cook the dough for a bit then put the toppings on? And do u turn the oven down at all?
Make the entire pizza on the uncooked dough and put the whole thing into a preheated 500 degree oven. Don’t turn the oven down! Watch your pizza carefully–should be done around 8 minutes!
Can you freeze easy pizza dough?
So, I ran across your page and gave this a try. It was a stretch getting the dough to “take” 2 cups of flour, let alone 3 (we must be pretty dry around here today!). I did replace some bread flour with whole wheat (1/2- 3/4), and added a pinch of water to help it become incorporated fully. This dough is SO forgivable! I forgot about it for several hours, then by the time I remembered it was too late to cook…so I just tossed it in the fridge overnight. The next day, it baked up beautifully for some of the most magical cheese sticks.
Thanks so much for the amazing recipe!!
Whole wheat flour sucks up liquids much faster than regular bread or all purpose flour…that’s why you used less flour. Glad everything still worked out!! 🙂
Ok, so I plan on making a large batch of the dough & then freezing. Has anyone tried this? I plan on quadrupling the recipe & then when dough is done divide it into 4 equal pieces & then freeze.
Bread dough freezes wonderfully! Then can take it out & put it in the greased bowl covered with plastic wrap. It can thaw & rise. It will just take longer like 3 -4 hours to thaw & rise.
Next month, I’m getting a Bosch mixer….I think I can do up to about 8 recipes at a time with it. Will try 4 at first. Eventually, I would like to try with wheat flour.
I would love to have a healthy pizza dough that is still convenient to use by just taking it out of the freezer. I have so many good recipes that call for pizza dough!
This was my first attempt at making homemade dough and it was so easy. I only used about 2cups of flour total and it turned out great. Very easy to work with after the dough had time to rise for 2 hours. Will no longer be buying the dry pizza crust mix. Thanks so much for sharing.
Do you start the timer when it goes in the oven or when the oven reaches 500 degrees?
You put the cheesy bread into the 500 degree oven. Once it’s in there, start the timer.
So delish! Easy to make and work with. The garlic bread… the best I’ve ever had! Thanks for sharing!
I dont have a kitchen aide mixer but I do have a bread maker! Do you think I could make the dough in it?
Yes, it should work!
I have never ever dared to do anything with yeast before. Got this link from a friend and dared to try it out. Amazing. This dough is amazing. Thanks so much for sharing.
Thank you SO much for this recipe. I spotted it on pinterest. This was the first from scratch pizza dough I have made and it did indeed turn out perfect. Really easy and the crust was lovely! I made the garlic cheese bread and the whole family loved it. One question/tip? What is your technique for stretching out the dough, do you do it by hand? A rolling pin? I tried on parchment paper but the paper moved all over the place and was super thin in the middle, super thick on the edges… so I ended up kind of stretching it between two fists and letting gravity help, then put it in the pan and stretched it further from there. Thank you so much!!
I try to stretch it and make the dough bigger just with my hands in the air, sort of like the people at the pizza parlors, except I don’t look as cool. Then once it’s a little bigger, I put it on my pizza pan and punch it out to even out the dough. Then the last thing I do is press it out with my fingers. I’ve never used a rolling pin…just my hands! Hope that helps!
Thank you for the help… I too don’t look as “cool” stretching it out either lol.
I made this the other night and did one sausage and olive pizza and one garlic cheesy bread. The only thing I changed was to use half King Arthur bread flour and half freshly ground hard white wheat. My family loved both and said the cheesy bread tasted like it came from a restaurant. Thanks!
Hey there. Thanks so much for recipes. I will surely try them. We have movie night each FRI with our kids and we normally make our own. Like you, we like our crust, but it’s never “just” right. I am excited to try yours.
I wanted to ask a question….What type of sauce do you use for regular pepperoni pizzas? We usually buy marinara (I can’t stand jarred pizza sauce).
I use Prego. Just the plain original or traditional kind.
I also hate jarred pizza sauce but found that Hy-Vee brand pizza sauce in a can is very, very good. And only 99 cents! If you don’t have hy-vee, I would suggest any other canned pizza sauces. It’s trial and error.
This is the EXACT recipe I use except I use all purpose gluten free flour blend from Dakota Prairie to make it gluten free and safe for us to eat! Best recipe ever…. THANKS!
I found this through Pinterest & can’t wait to try it. I have gluten to add to my regular flour — so I’ll have to experiment with it a little. I want to try it for our Friday pizza night – but doubt I’ll be able to get out to store today for bread flour. We’ve been experimenting with pizza doughs & decided to get the Bob’s Red Mill Gluten to add to our regular flour for pizza dough making (hubby did all the research on is smart phone while we were shopping a few months back).
This looks like the kind of thing that would make my husband SUPER happy 🙂
Dear Lauren
I have been wanting to find a pizza dough recipe that was easy for a very very long time! Thank You so much for being so generous with your gift!!! I will def be making this soon!! Rita
Do you let your dough rise in a particular way? Under heat, in frig, etc. Thanks for the fantastic recipie!
I just set mine on the counter. Nothing fancy!
This is now my daughters favorite “dinner”. Gotta luv finicky klids lol. atleast tonight when I said we need a vegetable with dinner she said “ok I’ll have corn with my cheesy bread” lolol
thanks bunches, and super easy!
Hi! This sounds really great. Do I really HAVE to use the bread flour?
If you don’t use bread flour, you won’t get the same result. If you’re going to use all purpose flour, knead the dough an extra minute.
Thanks! I’m going to make the garlic cheesy bread, looks sooo yummy!
Candace I used regular flour and it was still awesome!!!
Question, I have never heard of grated mozzarella cheese. I found shaved and shredded, but not grated….
And what exactly do you mean by “get the real stuff” when it comes to grated parmesan?
Grated is the same as shredded. In this case, I want you to buy a block of mozzarella and grate or shred it yourself. Real parmesan cheese is called Parmigiano Reggiano and it will say so on the rind.
I love the photos showing the correct consistency of the dough. That’s the part of dough making that I’m always unsure but your pics are a huge help! I am definitely trying this recipe. Great job!
This looks so good! Do you think there is a way you can make the dough ahead of time and refrigerate or do you think you have to use the dough right away?
Totally refrigeratable!
I tried this recipe and they were DELICIOUS! My fiance and I loved them. My do not look as good as your however, since my oven is the devil, but they were truly incredible. I didn’t use the garlic though since my fiance doesn’t like garlic, but they were still fantastic. You are right the dough is fail proof! Thank you so much. I also blogged about my experience with it. 🙂
http://scottierica.blogspot.com/2012/01/cheesy-garlic-bread-sticks-minus-garlic.html
OMG! I just made this but added 1 tbsp + of garlic powder to the dough…..holy cow my finicky 9 yr old thought it was the best crust ever!!! tyvm
I used this recipe to make cheesy garlic bread and a pizza… it’s the best pizza crust I’ve ever made! The 1-2 hours of waiting time is worth it!
This was a huge hit in my house!! Made it just as above and it was great! Thank you!
Can you make this with whole wheat flour and if so would you use the same amount?
I just made pizza, using a stone and it is amazing! Crispy bottom, chewy crust. I will be sharing this recipe with all my friends. Thank you!
Guess what’s for dinner!?! I will get back to you after cleaning up from the drooling my family will be doing in anticipation!
[…] I need to try making these cheesy garlic bread sticks. […]
I am hoping you get this in the next 2 hours :p I want to make this tonight. I was going to go home at lunch time and make the dough and let it rise….will it matter if I let it rise for 5 hours? I have to come back to work….and by the time I get home I won’t really have time to make the dough and then let it air or 2 hours 🙂
Laureen – this recipe looks great and given all the positive comments, I can’t wait to try it! Do you pre-cook the pizza dough before topping it?
I know someone mentioned cooking on the [pizza stone on the] grill, which is one of my favorite ways to cook pizza in the summer, and she suggested pre-cooking on booth sides which is usually what I do with a store bought crust (I know, shame on me!).
I’ve never pre-baked my crusts. Always put the toppings on and bake it all together in a really hot oven!
[…] start this week off, I made a double batch of pizza dough using my new favorite recipe . Thanks Lauren – I love this recipe! I actually made the dough a few hours before my cooking […]
I love it all except the part about waiting 1-2 hours for it to rise. I don’t get home from work until 5:30, so it would be almost 8:00 before we could eat. Any way to make this up ahead of time and keep it until it’s ready to use?
You can make the dough in the morning before work, cover it and let it rise in the fridge. Then let it sit out 30 minutes before trying to work with it. That should work just fine! Good luck!
[…] pinned this recipe for Joey, who loves making homemade pizza. It’s a recipe by Lauren’s Latest called “Fail-Proof Pizza Dough and Cheesy Garlic Bread Sticks.” This recipe was fantastic! It tasted exactly like the Olive Garden’s flat bread pizza […]
How can I adjust this for a bread machine, since I don’t have a stand mixer ? This looks soo yummy, I must make!
I just made these and they are awesome!!!! Thank you for the recipe! First time I’ve ever even made dough!!! Found you via Pinterest.
Like you, I have tried several different dough recipes with so-so results. I tried yours last night and was blown away. I am new to using yeast, and since I don’t have a stand mixer, was nervous about kneading by hand. But I did it for a full 6 minutes like you said and it turned out PERFECTLY. I ate my pizza in complete awe that *I* had made that crust! This pizza dough recipe is definitely “the one”! I used the whole recipe for my 15″ pizza stone and it was great. I can’t wait to make the garlic bread sticks with it.
Thank you so much for perfecting your recipe and sharing it!
Can this dough recipe be used with a bread machine? I would love to try it but I like to just throw it in the macine (dough setting) and let it go.
Thanks
We really enjoyed these. 🙂
I made it half whole grain and nobody even noticed. They were awesome! Forgot the marinara, though. They were still yummy! Happy new year to you.
I just made this last night and I can tell they will be amazing the next time I make them. This first time was a bad experience though! Somehow my parchment paper started on fire in my oven! The paper also seemed to completely melt to the bottom of the breadsticks. My husband and I still ate them because they looked and smelled so delicious. We just had to spend a little extra time picking paper off the bottom before we took a bite. I think next time I will skip the paper. Also, I made these with whole wheat bread flour and they turned out so good, much better than the dough I get from my bread machine! Thanks for the recipe!
[…] Free Applescotch Dessert Fail Proof Pizza Dough and Cheesy Garlic Breadsticks – just like in the […]
I love the cheesy bread. I also used the left over to make really good personal meatball subs. This I’m making batch number two today. Thank you for the pizza dough recipe, it’s great!
I made the bread sticks last night and they were delicious! Definitely something I’ll add to my appetizer rotation. Thanks for a great recipe!
Forgot to mention… I totally do the walk away when I’m using my mixer! My breads turn out so much better if I leave them mix for a while!!
Lauren, I just found this beauty on Pinterest and it’s going on our table tonight! We are celebrating my mom’s bday, and the kids are not very keen on the soup I’m serving. This cheesy bread will make them happy!!
Found this on Pinterest! I made the dough tonight and tried half with your cheesy bread recipe, and used the other half for hawaiian pizza (gotta use that leftover Christmas ham!).
I didn’t have bread flour so I used all purpose, and the dough turned out great! This was my first time making pizza dough and it couldn’t have been easier or more delicious! It was chewy and crispy and we loved it!
500 was too high for my oven, the cheesy bread turned out too brown. It was perfect in our opinion, but looked nothing like the pictures here. I baked my pizza at 475 for 11 minutes and that was perfect. I just put the pizza on a round pizza pan (not stone) and it worked just fine! (my cookie sheets are too small)
I always read the comments to get user tips before trying something new, so I thought I’d share my own! Thanks for the recipe! I will be making it again and again!
Can I melt the butter & mix in the garlic? Or do I just have to wait until the butter is super soft & mix it together then spread it on?
Either ways work!! Do what’s easiest for you.
Thank you for this tutorial, I had it pinned for a while before deciding we’d use it to make our Christmas day lunch with 🙂
And we did….we had pizza for Christmas day lunch and it was just perfect! Thank you ever so much x
Here’s the link to my post http://www.handmadebymrsh.blogspot.com/2011/12/christmas-day.html
best homemade crust I ever made..followed recipe exactly and it is great!!
tried this recipe and our family thought it was the best one they had ever tasted for homemade crust..can’t wait to make it for cheese sticks
Hi Lauren! Just made these breadsticks tonite, & they were awesome!! Now I don’t have to go out for pizza anymore! Thank you so much for posting this!!
Wow, the cheese bread looks so yummy. Will definitely have to make this!
Can you freeze or keep the dough the fridge?
Yes!!
[…] First I have mastered the art of hand made pizza crust! I use This recipe: https://laurenslatest.com/fail-proof-pizza-dough-and-cheesy-garlic-bread-sticks-just-like-in-rest… […]
[…] Pasta, Veggie, Garlic Pizza Breadsticks Vegetable Minestrone Soup, Rolls Apple Scented Venison Roast, carrots & potatoes, rolls […]
[…] laurenslatest.com via Christine on […]
Hi Laura,
I just tried your pizza dough recipe and wanted to say thanks- It worked perfectly!!
I made the cheesy bread and topped it with pepperoni – so good!
Thanks again!
Suzanne
Trying this tonight – can’t wait! Do you think you could make pre-made pizza’s and freeze (with the sauce cheese and toppings)? I would love to just be able to pull these out on busy nights and cook like a normal frozen pizza from the store – wonder if that would work… Anyone tried? Did you defrost first, or just pop it in?
I’ve never tried it, but I don’t see why it wouldn’t work!!
I used the “no fail dough” recipe tonight. I made a 3 meat pizza and the garlic cheesy bread. It was a hit with both of my daughters and my wife and I loved it, too. Needless to say, we won’t be ordering in much anymore.
This is what i’ve been looking for i will really try this….i really love pizzaaaaaa 🙁 thanks in advance…:)
[…] Slightly Adapted from Laurens Latest […]
Tried this tonight for birthday pizza…. knocked the socks off my regular crust. Thanks!
I tried this recipe, and it worked! It is just like it says, fail-proof-pizza-dough! It was so delish! It worked even though i only had all purpose flour. Thanks for an awesome recipe.
I cheated and used the Dough Boy’s pizza dough instead of making my own dough because we were being lazy. It wasn’t as good as I had hoped because the flavor of the dough was overwhelming but it was still very good. I can’t wait to try it with the right pizza dough. Thanks so much for sharing this! 😀
[…] first recipe was this recipe and I kept my hopes high due to multiple positive comments and also because I got this recipe […]
just saw this on pinterest & got so excited! it looks like one of my favorite cheese breads from college!!! making this soon 🙂 thanks lauren!
Can you use all purpose flour?
Hello! I tried this recipe out this week. Split the dough. Baked a pizza from one half and froze the other. Baked another pizza from the frozen half last night. Turned out great both times! However, I used a round pizza pan instead of a stone to bake the pizza. Temperature needed to be a lot lower in my case…425 degrees actually. Thanks for posting the recipe!
I have the same question as Heather. Can you freeze/refrigerate the un-used dough?
Thanks for the tutorial…the crust is awesome!!
Yes! I’ve frozen it several times! Once you pull it out, you may have to knead a little flour into it so its not so tacky, but it works just fine!
[…] Ah…….the sweet taste of success. Yup. I’ve found the dough recipe of dough recipes. And I’m going to share it with you. (Original Recipe by Lauren’s Latest) […]
[…] Recipe adapted from laurenslatest.com […]
I have made this several times and it is absolutely wonderful! I am wondering if it will freeze and still taste as good?
[…] Recipe adapted from laurenslatest.com […]
I made my own version of this the other night. Nowhere NEAR as talented as you are, but it was still amazing! Thanks for the recipe!
http://www.lindsayblogs.com/2011/11/14/cheesy-garlic-bread-sticks-recipe/
[…] you?) and came across some really amazing looking recipes. But, out of all of them, this recipe for Fail-Proof Pizza Dough and Cheesy Garlic Bread Sticks really stuck […]
Found you via Pinterest and couldn’t resist the pic.These look delicious. I love cheesy bread and now I can make my own.
Thank you!
I have a pretty simple and easy perfection to my world class homemade pizza (or so says my family) but I may have to try this one. I’m making cheesy bread tonight for my solo dinner (yay for alone time with cheese and carbs). Mmmmm, makes me happy!
How long do you cook the pizza at 500 degrees?
About 10 minutes.
[…] from Lauren’s Latest via […]
[…] Anyway, what I’m saying is, go make it. […]
I just found this recipe via Pinterest. I’m from PEI aka Prince Edward Island, Canada. Land of Anne of Green Gables. Cheesy Garlic Bread is known as Garlic Fingers here. You can purchase them at any pizza place. They are best served with donair sauce. Here is a link: http://allrecipes.com/Recipe/dashs-donair/detail.aspx This link also has the recipe for donairs, a stuffed pita with seasoned meat. They are VERY popular here also!
I have made this crust twice in the past week. My family loved it. The second time I made it I subbed one cup of cornmeal for a cup of flour (cornmeal crust is trendy where we live). It made the crust so light and a little bit crispier. I made an appetizer pizza with it, and it was a HUGE hit. Thanks for a great recipe.
This pizza crust really was the best. It was exactly what I was looking for, and I’m going to hang on to it forever. Thanks for making my pizza dreams come true!
My husband despises pizza- can’t believe he married me seeing as my family has pizza EVERY Saturday night! 🙂 I decided to torture him and try this one during the week, I must have been trying to start a fight!
He LOVED this, and truly has asked me for it every single week! We add pepperoni to his side, and dip it in crushed tomates with basil (super cheap for the huge can, like.. $0.68 often!)
My only difference is how I bake it- I use my jelly roll pan (spray some Pam) and push and pinch it all out, the whole recipe fits well into my jelly roll pan. A package of mozzarella pre-sliced or pizza cheese mix is the perfect amount, too!
I do notice when I use honey, it is to me- 100% better tasting, my husband could care less 🙂
Just made this for a church potluck! I made it last minute and didn’t have the recipe in front of me, so I used as much butter and garlic as seemed a good idea at the time. For a 16 inch crust I used one stick of butter and about 4 small garlic cloves. Mozz, good parm, then some ‘sprinkle’ parm I had left over. It was AWESOME! It was gone within 10 minutes of putting it down on the picnic table. And I got many compliments to boot! Thanks for a new recipe I can whip up in 20 minutes! (I keep premade crusts in the freezer.)
Awesome, Crystal! Glad you liked them! You can never go wrong with butter, cheese and garlic!
Best pizza dough we’ve tried yet…and I’ve been on a search trying many to find the perfect homemade pizza dough. Thanks so much for the great recipe. It’s a keeper!
I stumbled onto this recipe and it looked great, so I gave it a try. I have now used it no less than 25 times. It is the best pizza crust and garlic bread I have ever had. Thank you for sharing this with everyone!
I really wanted to make these but I didn’t have any mozz cheese and I only had the fake parm cheese :-/ But I went ahead and tried it anyway…..I used olive oil instead of butter and sprinkled the fake parm cheese on after they came out….I also used AP flour so i basically completely changed the recipe BUT they were amazing! This was my first time using the dough blade on my food processor and I’m so impressed! They were so good that I had to go ahead and make the other half of the dough….I can’t wait to try this again but as cinnamon sticks!
OMG! This dough recipe looks delicious… and super easy! Pizza is my favorite. In fact, I have an entire page devoted solely to pizza recipes on my blog! Check it out sometime: http://pantrychef.wordpress.com/recipes/pizza-recipes/
What temp do you cook the pizza/bread sticks at? 500F?
Yup! 500 degrees!
This recipe is FABULOUS!! My very picky daughter said “mom, this taste just like what we get at the restaurant!” It was delicious and this will be my new pizza dough recipe. Thanks for sharing!!
My dough is rising as I type this. So excited. I have had this page bookmarked for a loong time because I didn’t have a standing mixer but yesterday I realized that my hand mixer has a bread kneader attachment 🙂 so excited to try this.
Love the recipe and posted it on my community foodie blog. Hope you can come check it out at www.facebook.com/thefrenchiefoodie
C
Did you use the regular attachment on your mixer or the dough hook for the kneading? Looks yummy!
The dough hook! Sorry I didn’t clarify!
I’m sitting at the computer eating this right now!
The dough turned out perfect, absolutely beautiful (I had to use AP flour, since that’s all we had, and it took an extra cup or so, but that doesn’t seem to have affected the result for me).
Made it into the cheesy-garlic sticks, so tasty.
Thank you so much for a wonderful recipe!
Can I mix this hand?
The BEST pizza dough I have ever made! YUM!!!!
Does the bread dough freeze well? If not, do you make pizzas/cheesy bread “ready to bake” and freeze them that way? We’re a small family so one pizza is good for dinner, but I don’t want to waste the extra dough!
I froze half of mine and it came out just as good.
Divided it after the rise, formed it into a disc shape, then covered it in plastic wrap, making sure that the wrap is directly touching the dough all over – no air bubbles. I pulled it out of the freezer and put it in the fridge the night before I wanted to use it, it was all thawed out and pliable by dinner time the next evening. After that, it’s all the same as the first time around =)
I have these in the oven right now! Your pictures totally won me over. I have been making all sorts of pizza crust recipes without finding THE ONE, so I was extra excited to try your recipe 🙂
I hope the dough worked out for you and you loved these as much as we did!
Can I use all purpose flour?
yes!
This looks great. I make allot of doughs but am never 100% satisfied so I’m trying this one in hopes that it’s the one, but I do alot of my prep on Sunday’s and am wondering if this one will freeze well. Have you tried it and if so did
you think it did well?
I haven’t frozen this dough before, but I have frozen other pizza dough recipes and they have turned out fine after you defrost them. I don’t see why it wouldn’t work!
I have probably 20 pizzas in the freezer right now! Make your dough, shape it and cook it at 400 for 5 minutes. Otherwise when you cook it the toppings may be done but the dough will still be doughy. Let it cool and top with pizza sauce and favorite toppings. Put it in the freezer unwrapped for about an hour until everything including the sauce is nice and firm. Then wrap it up, put it in the freezer, and next time you want a delicious pizza it’s only 15 minutes away!
BRILLIANT! I’ve frozen dough before letting it rise with good results (or so I’m told – it’s usually for my husband because I’m out of town). But I’ve never even thought to assemble the whole pizza! I’ll have to try this next time I’m leaving town for a while!
Do you bake the dough before adding the toppings, so the dough won’t be soggy from the toppings?
No, if your oven is hot, the crust will cook and get crispy and not be soggy.
Just made the garlic cheesy bread with one half the dough and a pizza with the other. I couldn’t let the cheesy bread cool for 2 minutes-it just called me too loudly. WONDERFUL. I can’t wait to try the pizza…only 6 more minutes! Thanks for the recipe, it’s a new fave.
I want to make this RIGHT NOW! It’s just me around here so do you know how the second half of the dough does in the refrigerator for a few days or in the freezer for GOT TO HAVE IT RIGHT NOW occasions? Thanks for your diligent dough testing and sharing your results with the world. I have had the same problems with make at home pizza.
Wonderful recipe! I have tried SO many homemade crusts, and never liked any of them. After basically giving up hope, I tried this and loved it!!! The only thing I had difficulty with is the shaping of the dough. Do any tips to keep it even (instead of super thin in the middle and thick around the edges)? Thanks so much!
I usually just punch out the dough to get it flat, as even and as round as I can. Then after that, I use my fingers to press it out to a 12 inch circle. I usually have to go back over the same areas once or twice until it stays put. Hope that helps!
When rolling, begin with the rolling pin in the middle, then roll whatever way is needed, and return to the middle again. By rolling from the inside out, you will end up with a more consistent crust
Try a French rolling pin.
Made this tonite. Do you have any tricks for keeping it round? Whenever I roll/stretch it out it shrinks back in before I can top it.
You need to let the dough rest for 30 mins (maybe not that long) if it’s not relaxed enough to roll out.
Is resting separate from rising? If so, do you let it rise, punch it down, then let it rest?
We dd at least one TB of herbes de provence. basil, or whatever dry herbs/spices you may want to add BEFORE mixing. We love herbed bread dough!
Hi Lauren – I saw this recipe floating around on Pinterest and had to try it. It was LOVE at first bite. I actually put the recipe on my blog and did a shout out to yours. Thank you!! http://threeyellowlemons.blogspot.com/2011/09/garlic-cheesy-bread.html
Glad you liked them, Theresa!
This looks exactly like what we order at our local pizza parlor! Can’t wait to try it!
Ok, so I don’t have a stand mixer…can I still make this?
Yes! You can knead this by hand for 10 minutes! That should give you the same outcome.
This looks SO YUMMY!!!! I am trying this for dinner tonight!
Alisa
Could I do this in a bread machine do you think?!?! Cant find my dough hook… AHH!!!! P.S. LOVE your site..just found it!
I just made this dough and it looks amazing. Plan on making Calzones tonight with it. Any suggestions on cooking temp and time for calzone/stromboli?
Dear God, thank you for letting me find this site!!!! Amen!!!
Made this last night, soooo fantastic!! Made both batches cheesy bread and the first one was devoured lightening quick…..will definately be making this again. I mixed mine up in my bread machine so even less work. thanks for sharing!
Just made this recipe tonight. I made one pizza and one batch of cheesy breadsticks. Wow, this recipe rocks! I’ve tried homemade pizza many times and it has never been this good. I’m so glad I tried it. And it was really easy! My dough also didn’t look like yours and was really sticky so I added quite a bit more flour. Not sure what I did differently. Either way it was awesome! Thanks for the great recipe!
Sometimes the weather depends on how much flour you need to add in. It will vary from day to day. As long as you get it to the right consistency, then you should be good to go!
I have never been able to make good Home-made Pizza- Until now!! This recipe was awesome!! Even my picky husband liked it 😉 Thanks!
Awesome! Glad you liked it!
I’m making this tonight!! Sooo excited!
Hope you like them, Laurie!
[…] Adapted from Lauren’s Latest […]
Ok – I mixed the dough but it doesn’t look like yours. I think maybe I put too much flour? But the bowl wasn’t getting clean so I kept adding more. I have it rising now and I hope that this is finally the recipe that I keep. I’ve tried quite a few. Only the second time using my stand mixer – lol
Let me know how it works out!
The first time was ok and my husband really like the dough for pizza. The second time I made this dough for pizza came out better. This recipe is a keeper. Now I need a better pizza sauce than the Ragu pizza jar sauce – lol
Try “Exquisite Pizza Sauce” on Allrecipies.com
Lauren, thank you so much for this post!! I`ve never made pizza at home, but your step-by-step sure encouraged me to do so. I love, super love anything with garlic, and the cheesy garlic bread is on my top to-make list now. Thanks!! And wish me luck 😀
Ooooh, this looks awesome! So cheesy and delicious….definitely need to try this, yum!!
Do you keep it on the parchment paper when you put it on the stone or slide it off?
Yes, I keep it on the parchment. Feel free to use cornmeal and a pizza peel. I think the parchment is much easier!
my boys love cheesy breadsticks!! this just does the trick! thanks will try it tomorrow! will not pay for them at pizza restaurant again! homemade does rocks!!!
Grandmas secret for making yeast doughs….make sure everything is warm….. Flour, water, bowl. You can’t let the yeast get lower than body temp. Also, let the dough rise in a warmed, not hot oven. I preheat mine to 170. Then turn it off. Try cooking on an outdoor grill too. You have to cook both sided of the dough. It’s fantastic!
I might want to marry you. Right after I make some of this. 🙂
this looks so good! i’m drooling!! question – after rolling the dough out on parchment paper, do you leave it on the paper while cooking it?
thanks
Yup! Leave it on the paper for easy transferring to the oven.
This looks absolutely delicious and I’ll give it a whirl!! We love homemade pizza, but I too can never seem to get the crust just right. I have a question though. I am pretty sure my Kitchen Aid Stand Mixer instructions say to knead only on speed 3 or 4, but not on high? Which speed should I knead the dough on for 6 minutes? Thanks so much!!!
I kneaded mine on high. If you are going to only knead it at level 3 or 4, I would add another minute or two! I didn’t know that! Never read the kitchenaid manual….oops!
Thanks so much for the info. I will live on the edge . . and knead on HIGH :)! HA!!! Love your blog, and your recipes :0! Please keep ’em comin!!
Yeah I have a kitchenaid mixer and I’ve heard that the belt inside is nylon and it isn’t uncommon for it to need to be replaced if you make a lot of dough or mix it on too high a speed. ymmv. I am going to have to try the honey instead of sugar trick. I’ve been using the pizza hut knock off pan pizza dough recipe for a while now but I’d like to start experimenting with the flavor of the crust rather than just consistency and crunchiness.
Yup, you’re right! Just mix on low speed to not completely kill your mixer!
Thank you so much for this recipe. It is used at least once a week in my household. Tonight was pizza and garlic fingers. I like to make donair sauce to go along with the fingers. That’s how they are served around here. I use my kitchenaid mixer on high for 6 minutes and it turns out great.
if anyone is interested in the donair sauce recipe here it is.
1 can of milk (evaporated)
175 ml sugar
2 teaspoons garlic powder
4 -6 teaspoons white vinegar
Open the can of milk pour it into a steel or glass bowl (not plastic–it won’t set up properly in plastic). Pour the sugar & garlic powder in; mix this together well.
8
Slowly add the vinegar and mix this together slowly. (If you mix the vinegar in too fast it won’t thicken up properly).
9
Once this is done cover and refrigerate.
Omg, I LOVE DONAIR sauce! I used to go to this place in St. John Canada and it was a steak thing with donair sauce. To DIE FOR!
I used my kitchen aid, it said only on 2, no higher, and left it 6 minutes, was perfect!
Looks fabulous. Going to try this week on pizza night, thanks for testing it out for me 😉
Aimee
YUM! I need to make this asap…
I’m in love! These look just like a batch of garlic sticks that I’m obsessed with from my hometown. Now I can make them for myself!
This looks amazing! We make homemade pizza every weekend (my little guys LOVE topping their own individual pizzas).
I learned some great tips though for making my dough even better – can’t wait to try it with your recipe. And those cheesy bread sticks look so amazing, I am def. making those next time instead of a pizza.
Yours look like they came from a restaurant, great job. Thanks for sharing the recipe and all your tips.
Great photos! Those cheesy garlic bread sticks look so amazing.
Thanks!
Looks delicious! I’ve never been a big fan of tomato sauce, and so when I was little I would often just order cheese/bread sticks for my meal!
Looks like a perfect way to start any meal!
looks perfect to me! now you have me craving it! 😉
I crave this stuff at least once a week!
Pizza is one of my favorite things to make/eat! Never thought of making cheesy bread sticks from it though, love!
Sacrelig! How have you never thought to make cheesy bread sticks? They are SO good!
These kinda remind me of Souplantation’s garlic bread/pizza thing. Which is a total compliment b/c I’m not ashamed to admit it, I love the things! Great pictures!
Never heard of Souplantation! I’ll google them asap!
Thanks for doing all the work, because I’ve been looking for a great pizza crust recipe! Yay! And btw, I LOVE cheesy breadsticks even more than pizza. Perfect!
You’re welcome! It was really bothering me that I couldn’t get it right, so we just kept eating pizza until I got it right! Lol!
Um…whaaa? This looks unbelievable friend! I cannot wait to try making it!! My husband will be over the moon.
Let me know if you do end up making it! 🙂
Always , a great recipe from the Secor family
Can’t wait to try it!
Ask mom who I am
Deaaaaaaar holy mama! I LOVE CHEESY BREAD.
I want to it take it to the movies and put my arm around it.
Me and cheesy bread go waaay back! Love it.
How do you bake the pizza? What temp and for how long? ?
Thank you, your hard work of getting this dough perfect has paid off! The best dough ever! This is the second pizza I’ve made with it, both have turned out perfect !!
I LOVE THIS PIZZA DOUGH! Only problem is that there was a bit too much oil so we measured less than supposed to. This is still the BEST PIZZA DOUGH I’ve ever seen and it’s so easy. TYSM!
I want mine over for dinner and red wine
I cant enough its so freaking good